Car Ramps

Car Ramps for Lowered Cars, Small Cars & Trucks. Top Quality indestructible High Grade Aluminium. Make life easy! Call Clint on 0211144014 now

Car Ramps: The Best Car Ramps in NZ that’s super-strong, simple & effective

The Best Car Ramps that are the best looking Aluminium Ramps around that are suitable for almost all situations designed in NZ to stop the annoying bump and you bouncing or scraping your vehicle!

CAR RAMPS for all situations | ROADSIDE CURB RAMPS | ALUMINIUM EXTRUSION RAMPS | BEST CUSTOM ACCESS KERBB RAMPS

Car Ramps: Want The Best Kerb Access Ramps for your home or business entrance situation?!

Car Ramps: The Best Top Quality Alloy Car Ramps are designed right here in Rolleston (Selwyn, Christchurch NZ), custom made for your situation – to banish that bump and stop you bouncing and scraping!

We had ‘had enough’ of that b@$stard “bump” every time we went in or out of our driveway which kept destroying our wheel alignment each month, therefor making our car steer badly and our tyres wear out faster. I used to spend heaps on wheel alignments and new tyres. “Enough!” we said, let’s design the best Car Ramps in New Zealand we can imagine, so we did – it’s better than awesome I reckon!

“Whatever the application: Car Ramps, car access ramps, forklift ramps, curb ramps, kerb ramps, roadside ramps, entry ramps, garage door entrance ramps, curb or driveway ramps for your garage or even wheelchair access. We even do Forklift Ramps and Sliding Gate Ramps to stop the forklift loosing the load (Health & Safety). We even use make custom ramps for caravan or motorhome – you name it, we make it, it works!”.

+

+

Meet KERBY™ The Best Roadside Car Ramps

Car Ramps: The Best way to stop your wheels going out of alignment!
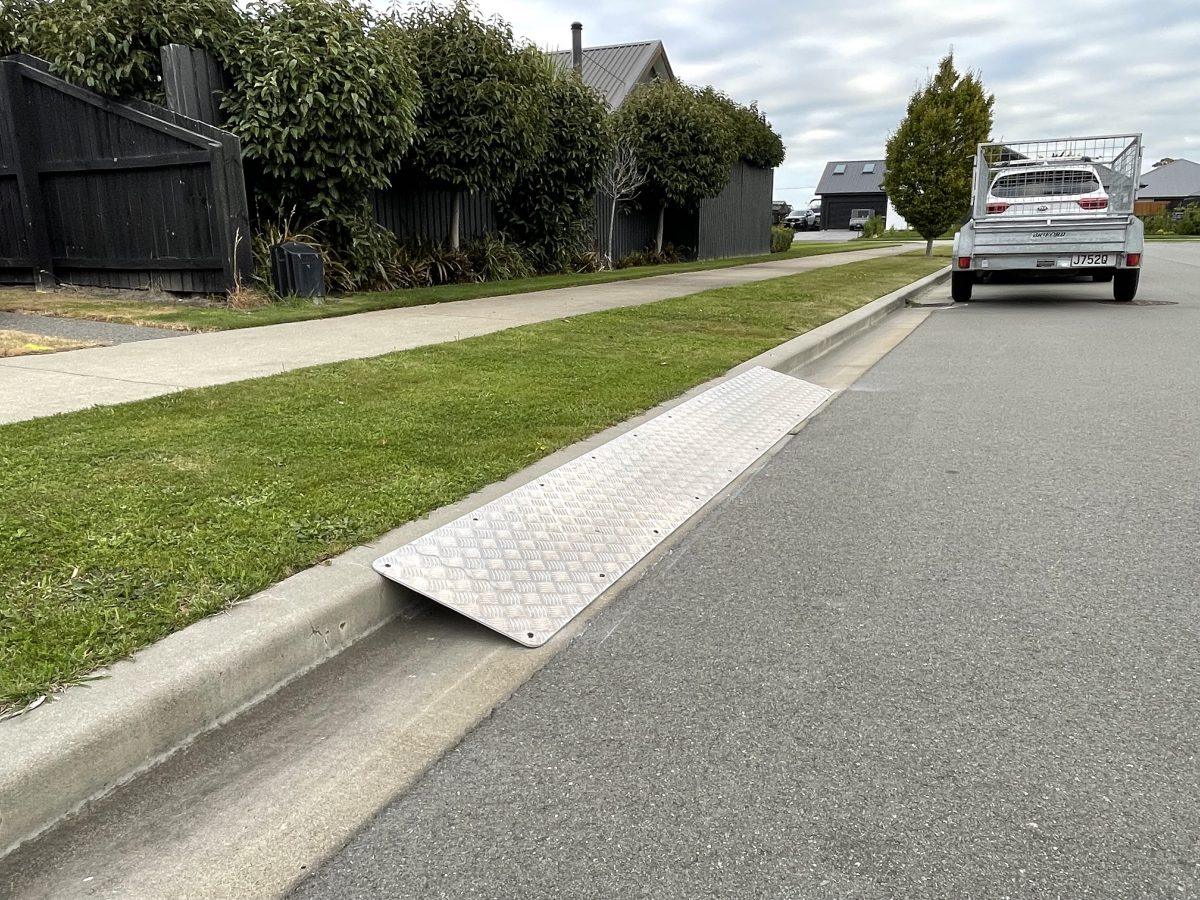
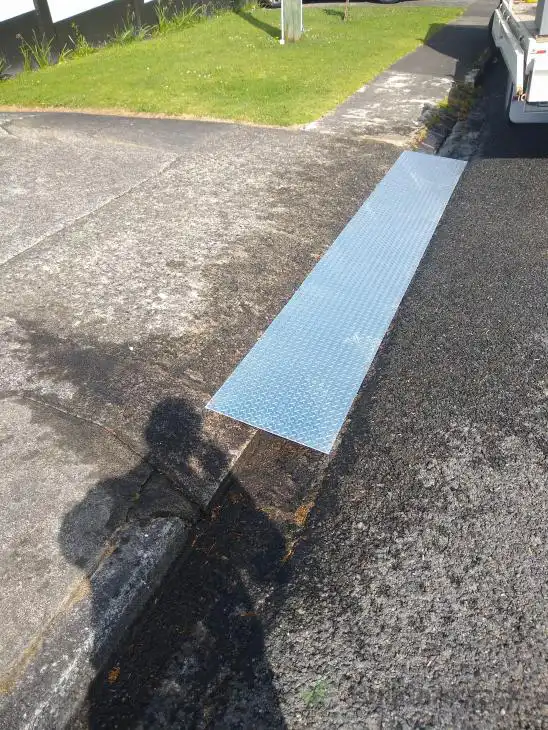
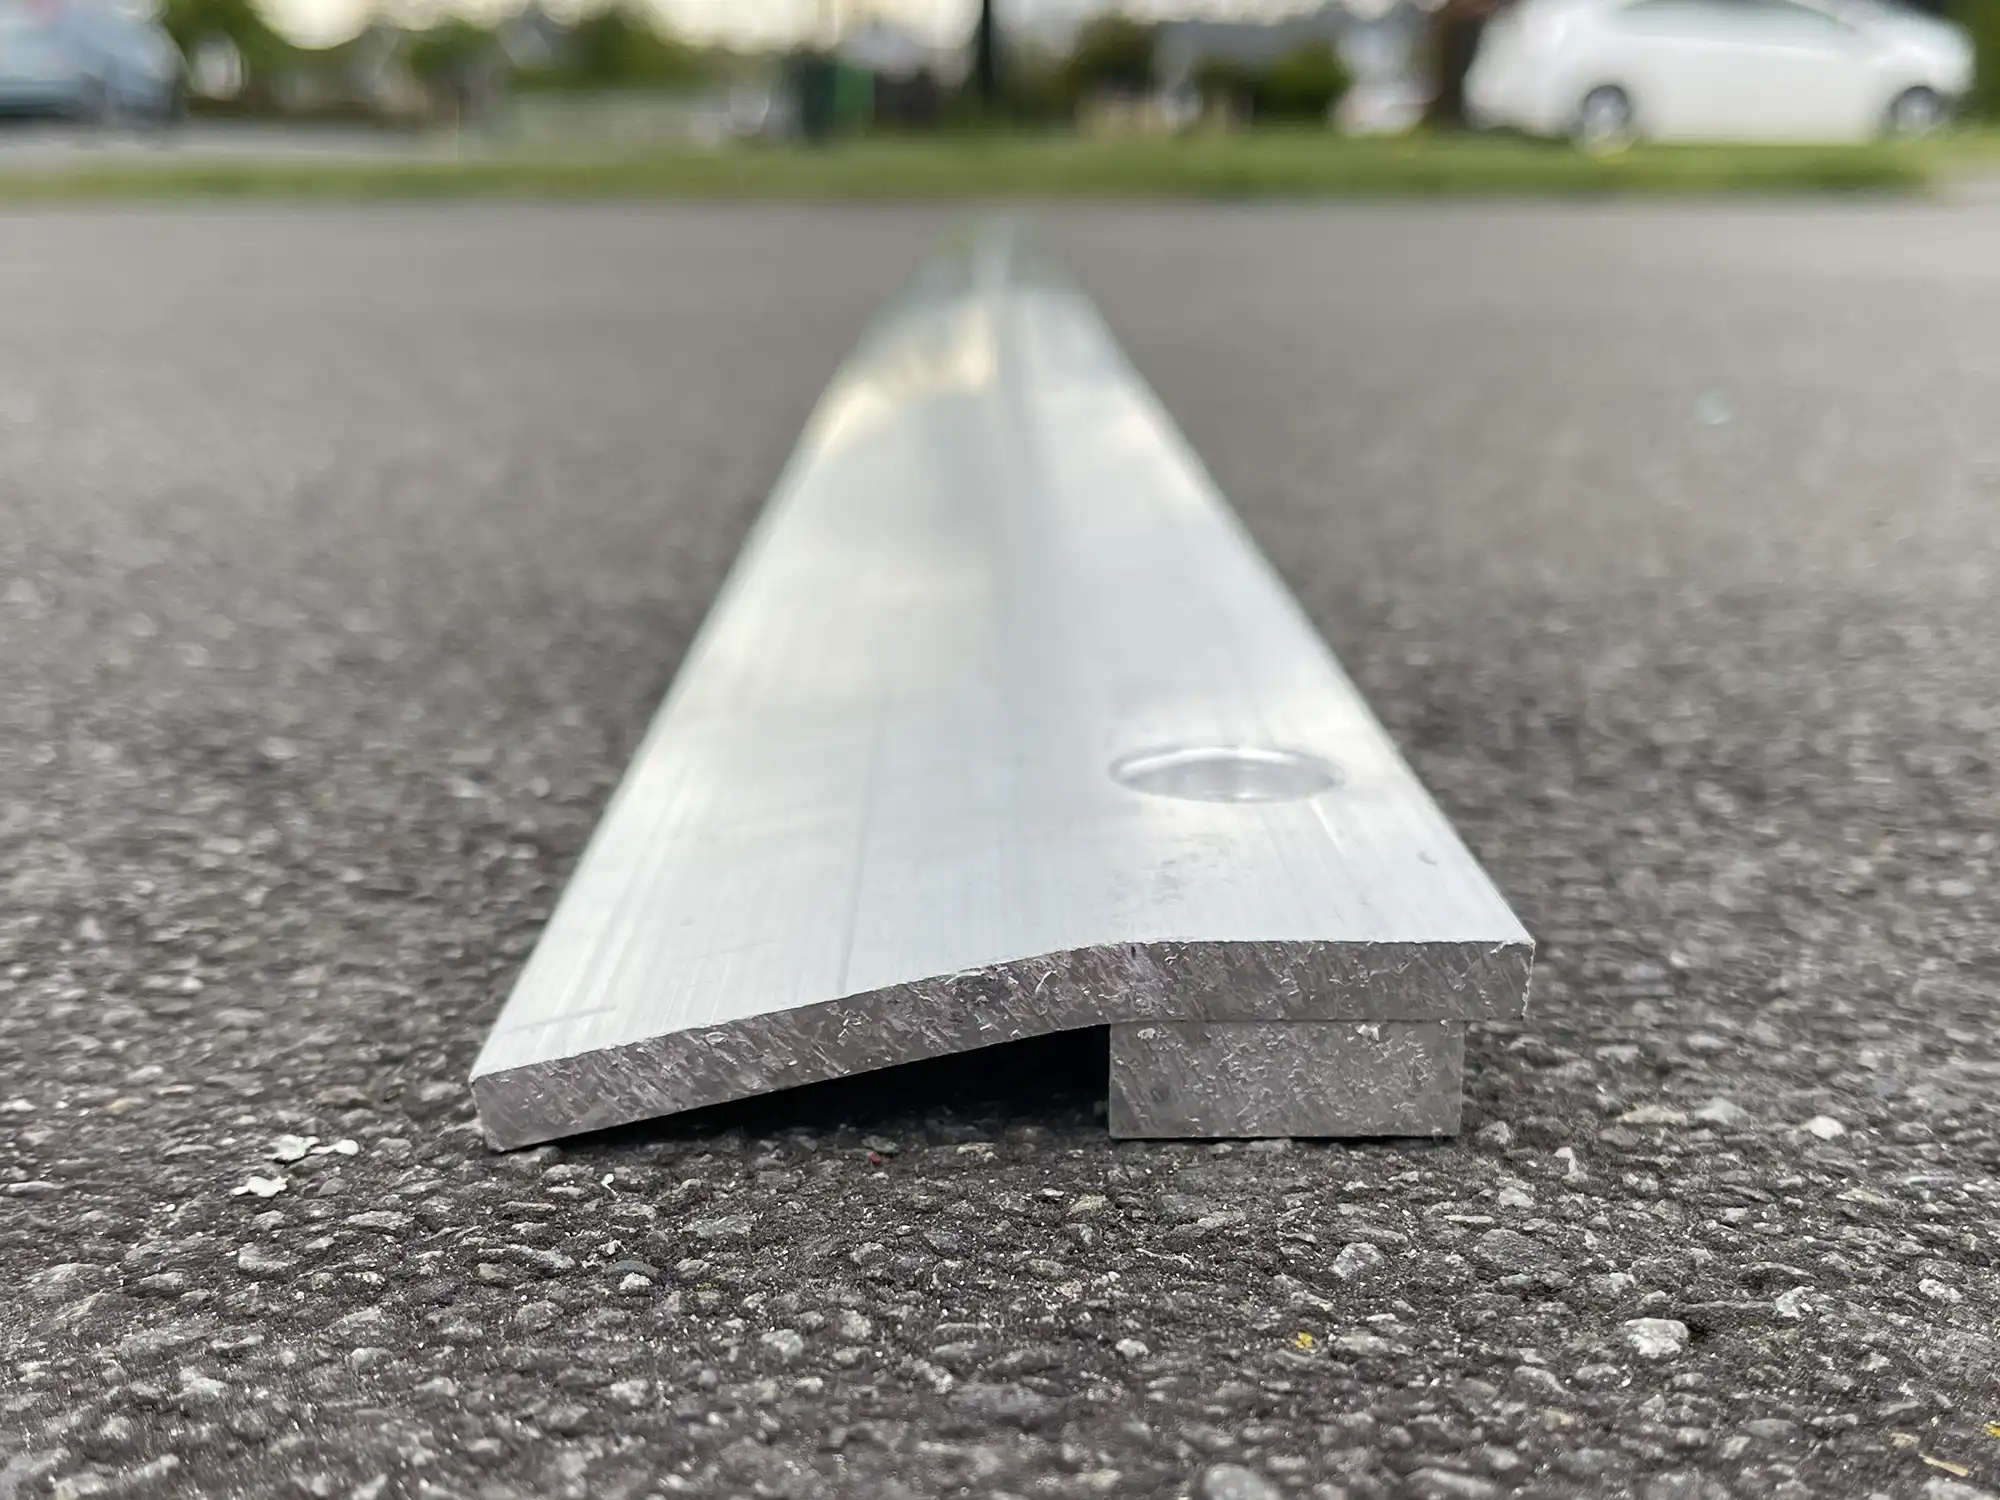
Car Ramps: The Best Car Ramp (KERBY™) is a super-strong Aluminium Fixed Access Ramp Extrusion system that fixes into the gutter area with 10mm sleeve anchors (Dynabolts), or sometimes concrete screws, to enable a superior smoother, safer transition over the curb/gutter. So no more bumping – KERBY BANISHES THAT B@$TARD BUMP! – and no more grinding the front off your car off, no more bouncing the trailer over the kerb, and no more expensive wheel alignments all the time! In fact, you can get on and off the road faster, smoother, quieter and more safely with confidence. You’ll forget it’s even there!

The Best Car Ramp made in NZ (KERBY™) is far superior to any other bent flat Mild Steel, rubber ramp or Mild Steel/Galvanised tread-plate folded ramps that degrade or sag and bend easily and quickly over time – they don’t look good and don’t keep performing. We’re all about good looks and first impressions right? KERBY™, The Best Car Ramp solves this problem and are in my opinion, are the best looking, most flexible and durable Aluminium Fixed Ramp Extrusion option on the market that I know of, it’s unique and copywrited. KERBY™ is designed for NZ situations to take even the heaviest truck. KERBY™can be ordered in many different lengths and configurations to best suit you and your situation, EVEN GOES AROUND A CURVE in a cul-de-sac. You can even use off-cuts as trailer or caravan chocks or stop ramps in the garage to stop the car going in too far (great for teenagers!).

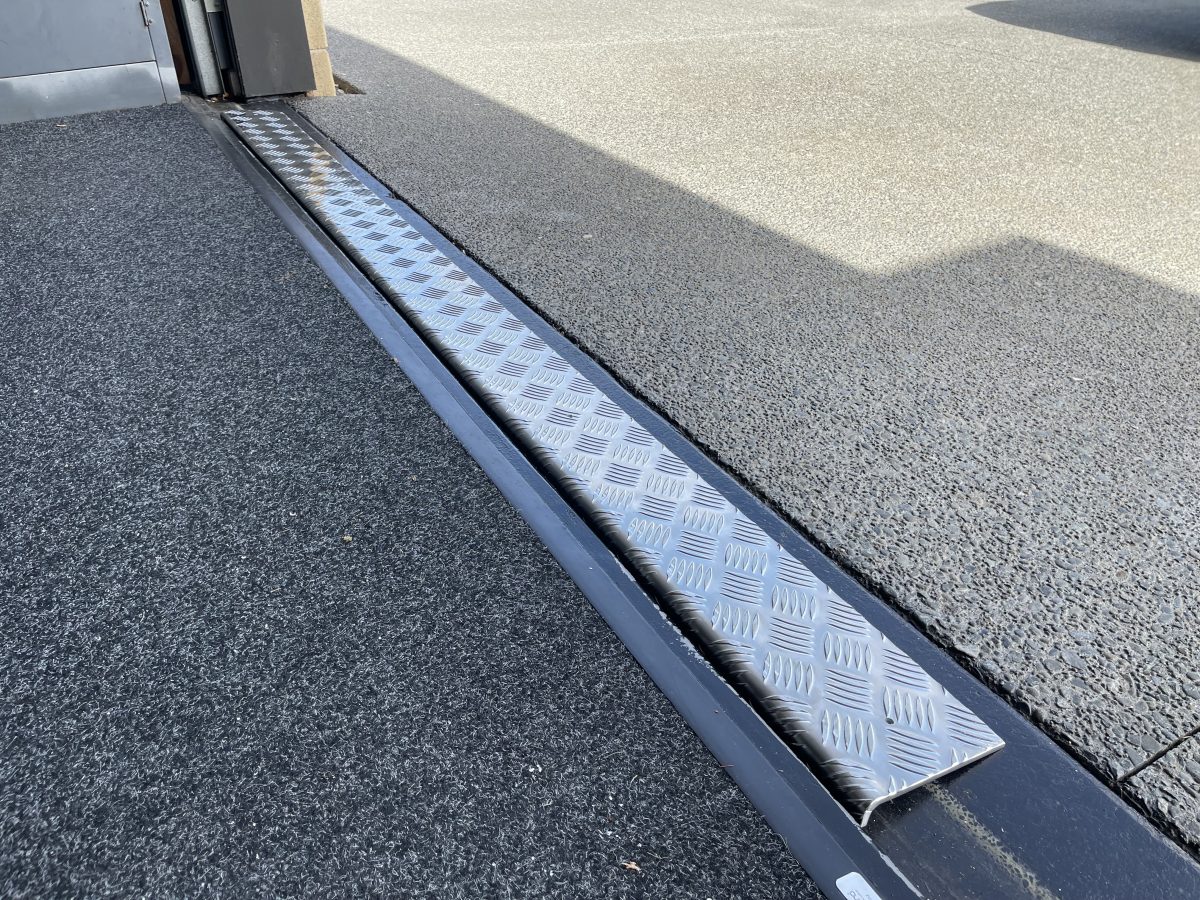
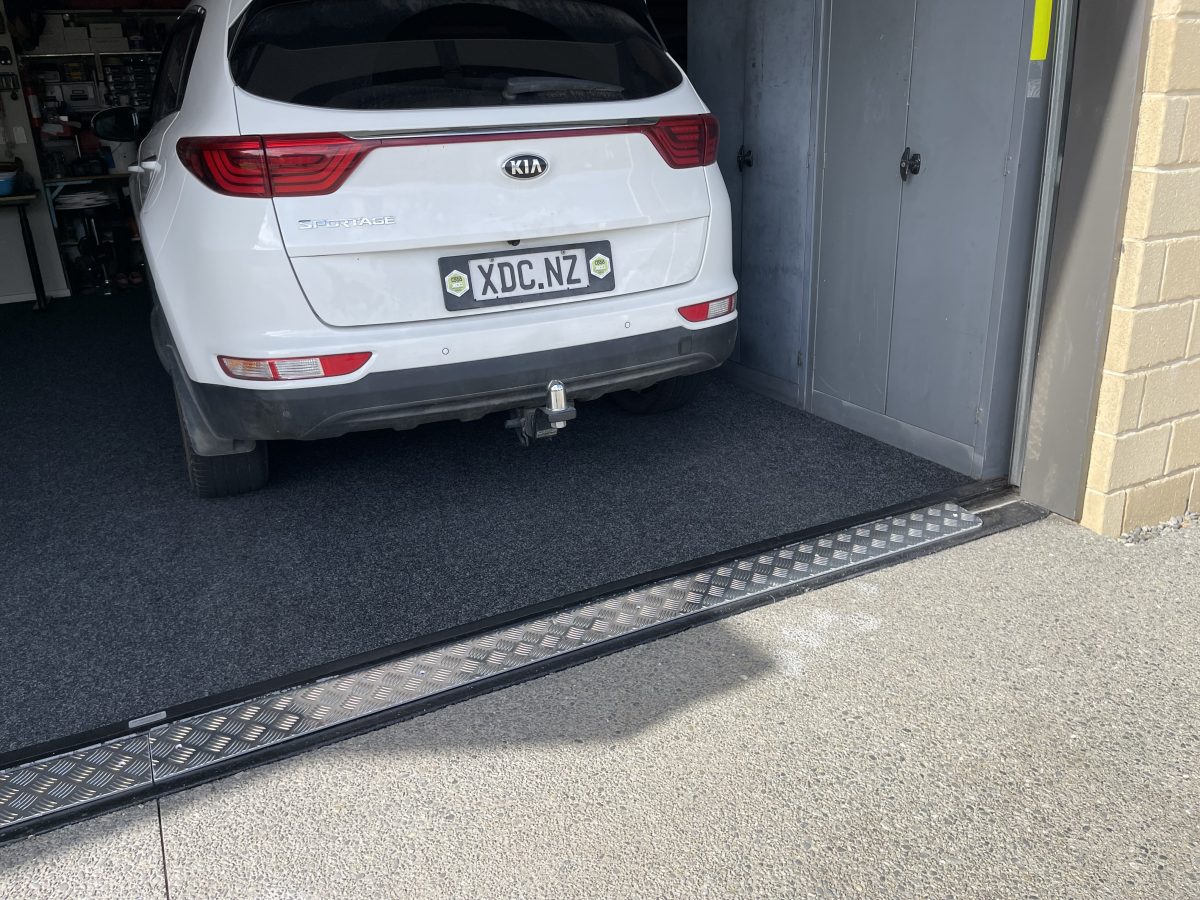
The image on the left is an example of a Standard Straight Powder-coated KERBY™ install and has been powder coated the same colour as this customers garage (Ebony/Black textured like Teflon).

Additionally I can put Hazard tape on them or even Glow-In-The-Dark tape so you can see it at night, which is pretty cool!

The size of a KERBY™ is 50mm High x 110mm Deep, by 4m length as standard length, which of course can be cut down into increments of .5m, 1m, 2m, or 3m lengths.

KERBY™ is The Best Car Ramp in NZ

Car bottoming out or scraping, need quicker smoother, SAFER access, or simply just want to BANISH THAT B@$TARD BUMP?!

Car Ramps: These heavy duty Aluminium extrusion car ramps, or gutter ramps, or curb ramps or kerb ramps or whatever you want to call them are designed to solve many problems, like BANISHING ’THE B@$STARD BUMP’ as you drive in and out, stopping trailer noise, stopping you bouncing over the curb, and saving your expensive wheel alignment, in turn saving your tyres. I have heard it even saves someone’s pet from falling out the window when they come home! KERBY™ looks and performs the best and is far cheaper than rubber ramps or flat mild steel ramps that sag.

Why risk damaging your classic or new car every time you pull in or out of your driveway?

Car Ramps eliminate bottoming out, scraping, bouncing & bumping over the kerb, and making banging noises when you drive in and out of your house, especially with a trailer. Stop that annoying bump and fill the gap between your driveway and the street access with a smooth, easy, speedy, and safe entry and exit with the best car ramp made in Rolleston Christchurch, NZ and can be installed locally at your place in a flash.

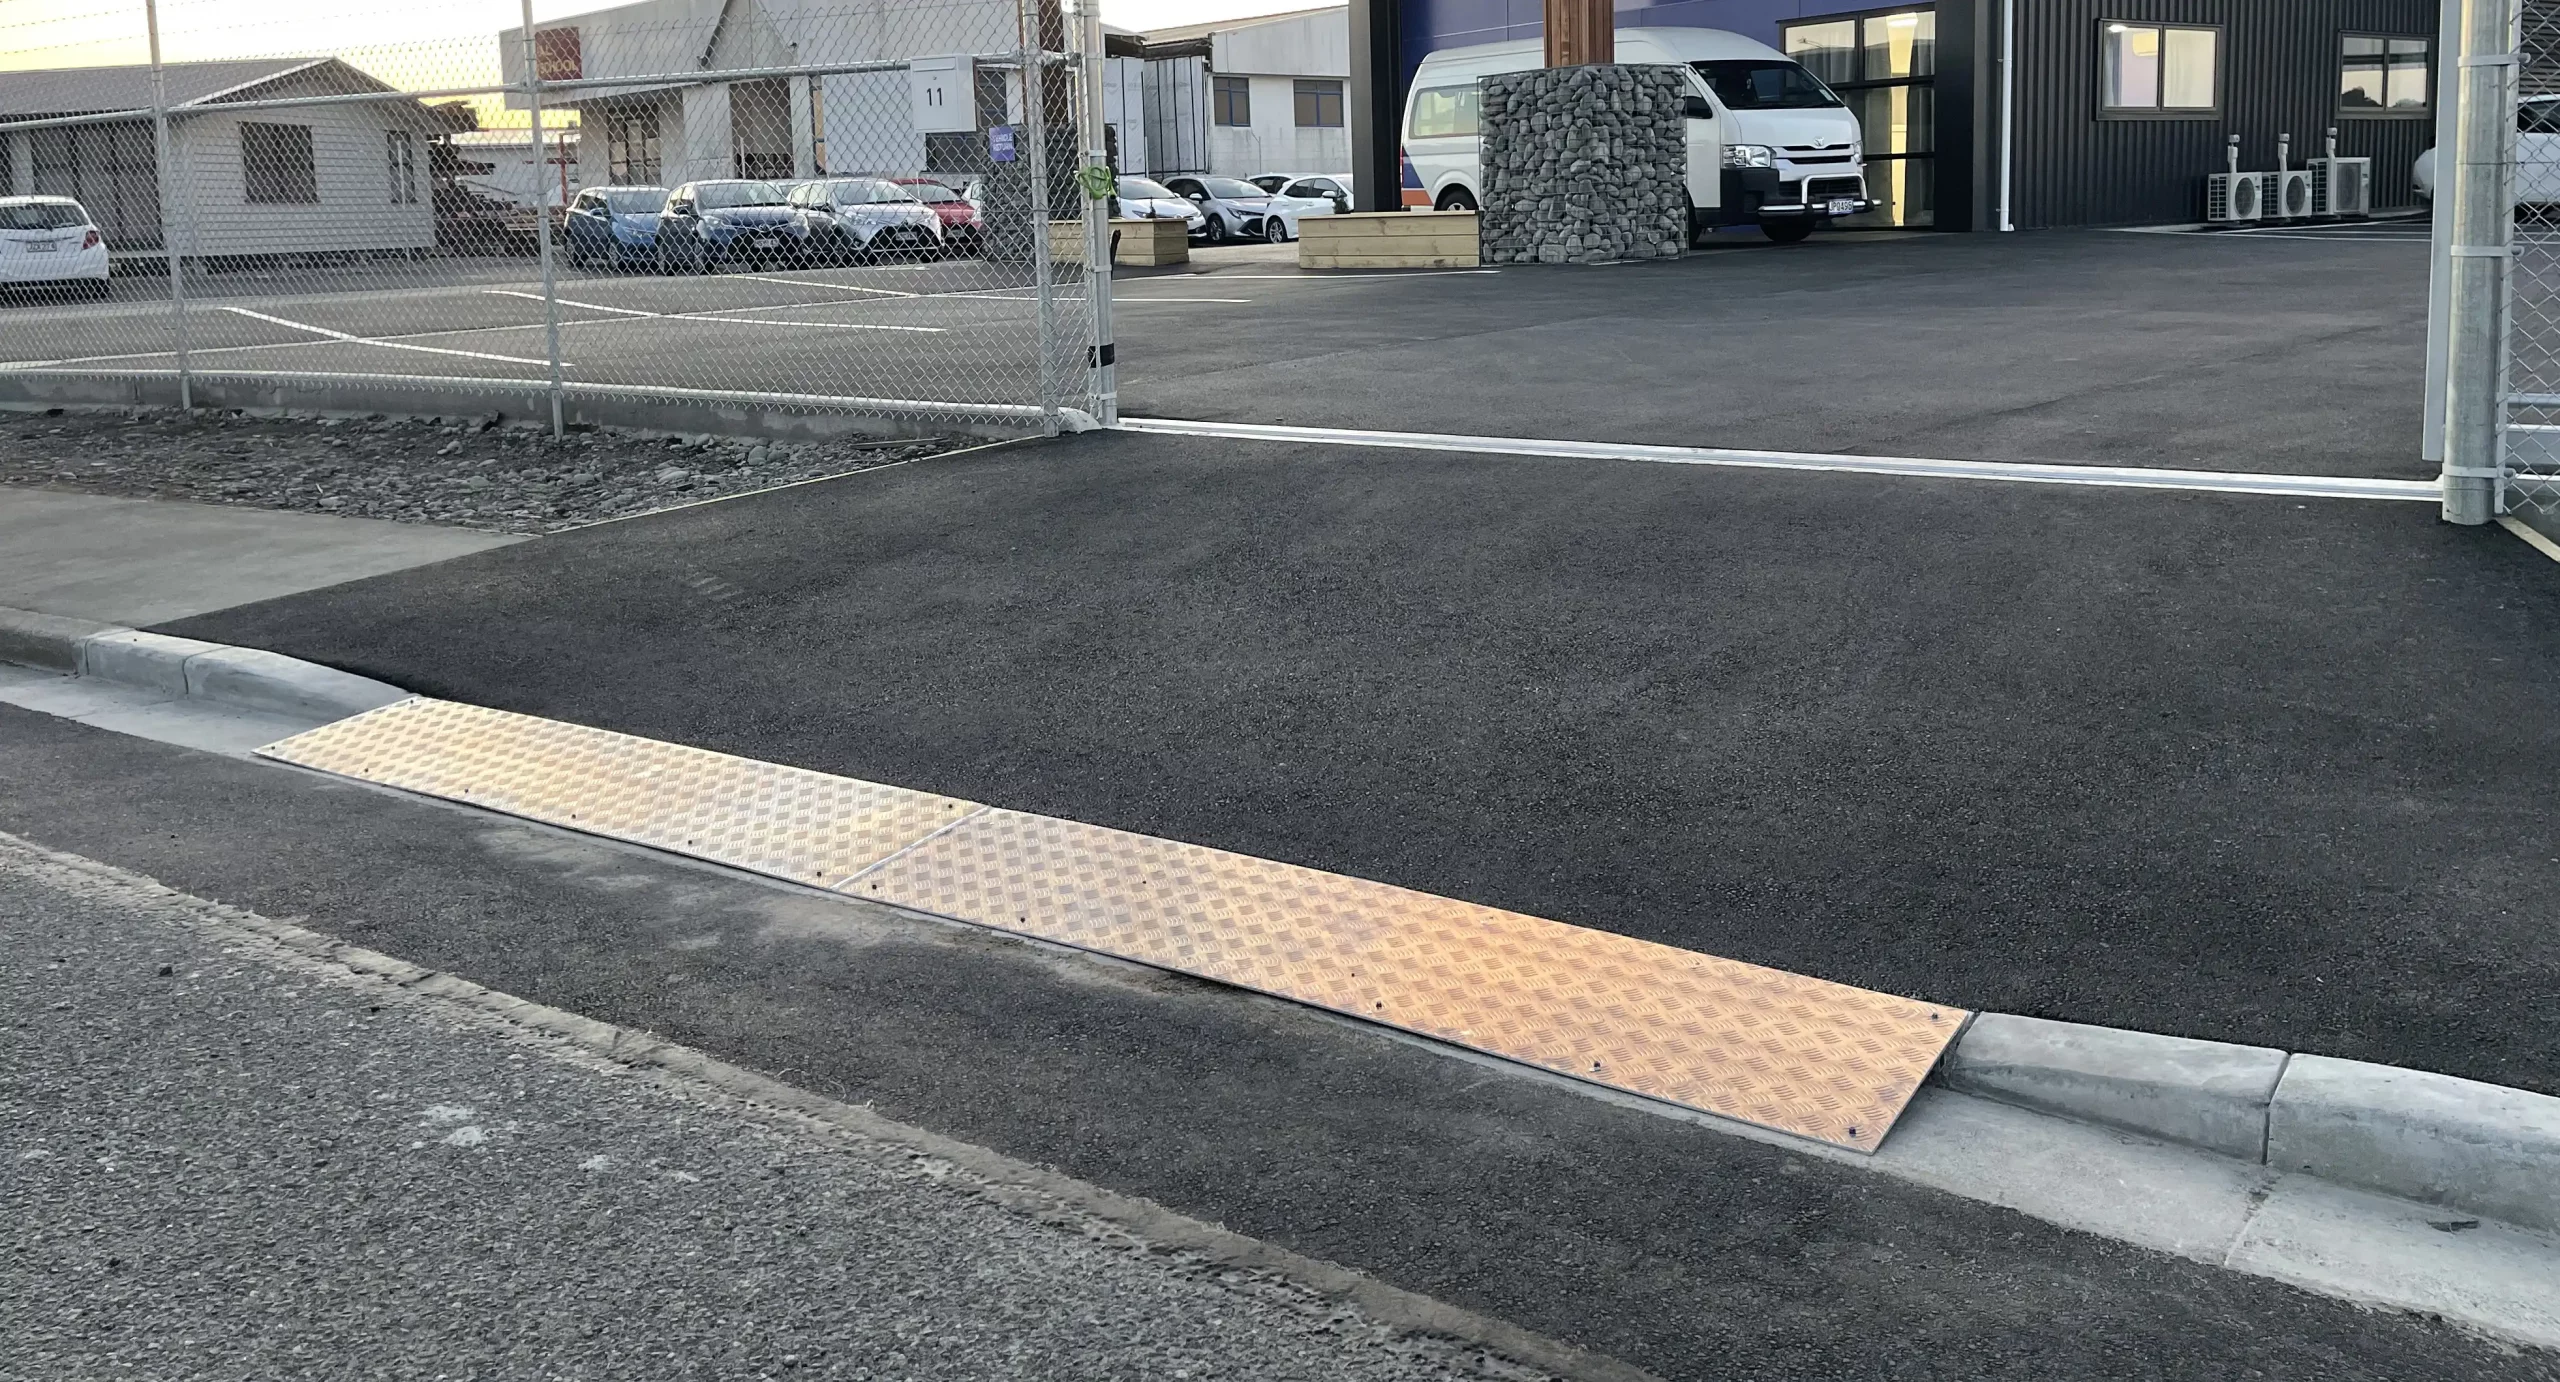
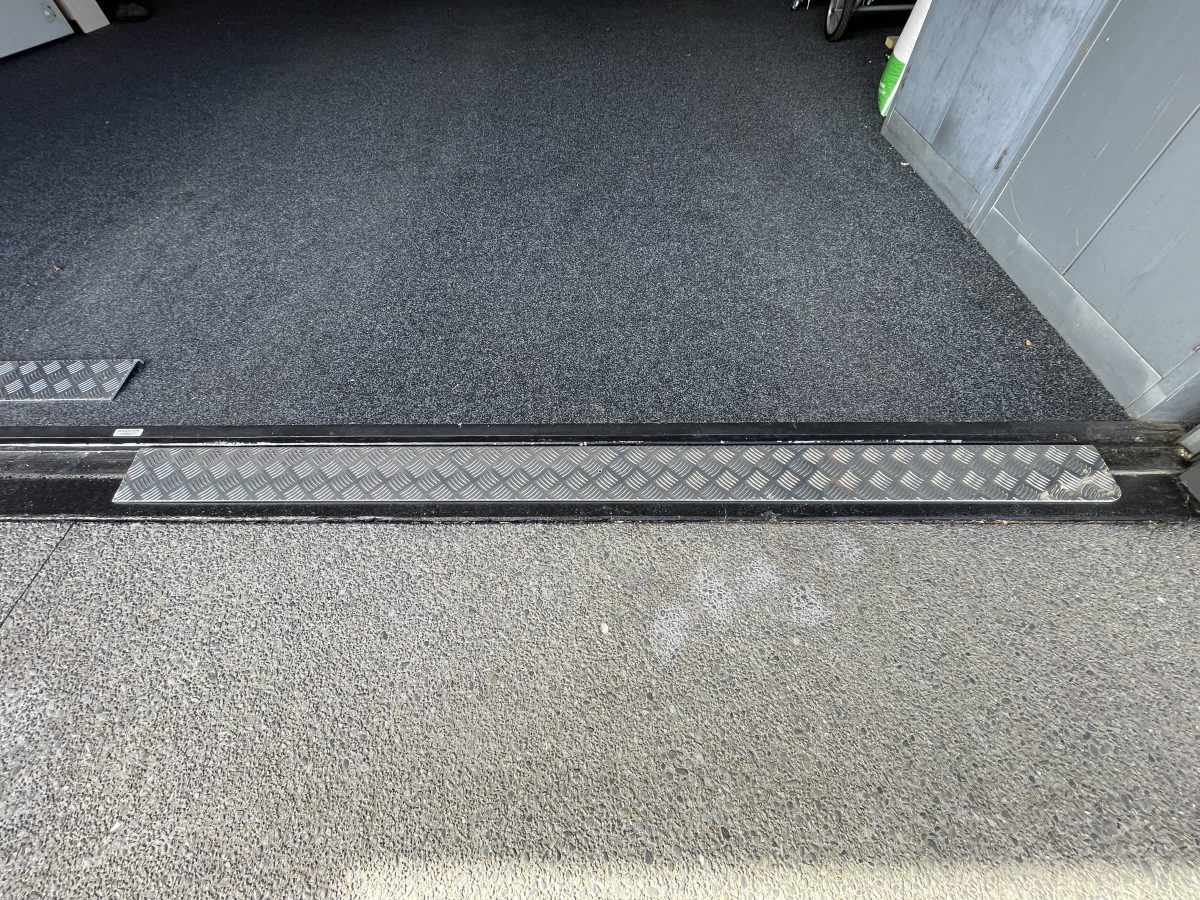
The image to the right is an example of a Custom Complex Concave Curved Install – I can literally bend this car ramp around a corner!

Want to eliminate that annoying bump in your driveway?

What's the cost of The Best Driveway Ramp in NZ?

KERBY.NZ Car Ramps Pricing

Car Ramps: The Best Car Access Ramps in NZ, KERBY™ are a hollow extrusion made from the highest quality, 6mm thick, T6 Aluminium which comes in 4m (Option A* – The Default Length) standard lengths and that we can mix and match and cut to multiple sized items in many combinations to suit your driveway width and curve. Please see the T&C’s as to what a Standard Install v a Customised install is.

There are three styles you can order KERBY™ in… 

A “CLEAN” length or section has NO FIXING HOLES – For Serious Full-On DIY’ers who have all the special tools.
Professionally “PRE-DRILLED” with Fixing Holes – You can DIY install these yourself but you’ll need all the special tools (see below).
INSTALLED” – We do it all for you, everything is included.

I just need to know your physical address, an email address for the quote, and the total width of the driveway/access point, plus a configuration of KERBY™ length(s) that may be required etc, see our quote/order form here. I will also need to see a phot or two to base the quote on. That can be sent to me from here. 

KERBY.NZ Car Ramp Prices

Configurations & Styles

Click on a colour below to reveal the current pricing (subject to change at short notice due to fluctuations in Aluminium prices)

NO FIXING HOLES – Full-on DIY – Straight from the factory. Click to learn more…

CLEAN DIY LENGTHS

Clean no-hole lengths straight from the factory for the Full-on serious DIY-er

Length Detail Price
1m 1x 1m length for a Slightly Curved or a Standard Straight entry $200+GST
1.5m 1x 1.5m length for a Slightly Curved or a Standard Straight entry $275+GST
2m 1x 2m length for a Slightly Curved for a Standard Straight entry $350+GST
3m 1x 3m length for a Standard Straight entry $500+GST
4m–A* 1x 4m-A length for a Standard Straight entry $600+GST
4m–B 1x 3m + 1x 1m lengths for a Standard Straight entry $700+GST
4m–C 2x 2m lengths for a Standard Straight or Slightly Curved entry $700+GST
5m 1x 4m-A + 1x 1m lengths for a Standard Straight entry $800+GST
6m–A 1x 4m-A + 1x 2m lengths for a Standard Straight entry $950+GST
6m–B 3x 2m lengths for a Slightly Curved for a Standard Straight entry $1,100+GST
6m–C 4× 1.5m lengths for a Slightly Curved for a Standard Straight entry $1,100+GST
7m 1x 4m-A + 1× 3m lengths for a Standard Straight entry $1,100+GST
8m 2x 4m-A lengths for a Standard Straight entry $1,200+GST
9m 3x 3m lengths for a Slightly Curved or a Standard Straight entry $1,400+GST
10m 2x 4m-A + 1x 2m lengths for a Standard Straight entry $1,550+GST

CLEAN DIY LENGTHS will need to be Pre-Drilled twice and installed by yourself into the concrete by using Sleeve Anchors, or you can ask a local friendly builder who like scones.

For skilled DIY-ers

DRILLING

TOOLS NEEDED: You will need a Drill Hole Punch Marker for steel or similar, or a Sharpie Marker to mark out where you want to drill all the holes. You will need a 20mm Starret Hole Saw or large Drill Bit or similar from an engineer type shop (that’s a big 20mm one, double the size of normal! That’s about $25 last time I looked). You will also need a normal type drill that can drill at least a 20mm top hole and a standard 11mm bottom hole perfectly level/perpendicular through the top of angled 6mm Kerby™ extrusion (preferably a corded/powered style as battery styles take so long and are usually under-powered). I use a drill press to achieve this to get all the holes level and perfectly aligned and centred, otherwise it makes installation life a bit of extra admin putting it lightly.

METHOD: Firstly, on the top of the 6mm extrusion between the top two spaced out ribs, where the only grove is (as a guide), mark where you want all the holes to be along the length on that groove line, all spaced out as suggested (following this) with a Drill Hole Punch Marker or Sharpie Marker. The hole sets are normally 100mm from each end, then spaced out at every metre. EG: Hole configuration on a 4m length from the first end to the last end is: 100mm | 1000mm | 2000mm | 3000mm | 3900mm*.  *100mm in from the last end. Secondly, drill your top holes of 20mm with a hole saw or similar, and then a bottom hole of 11mm all the way through the bottom through the same centre line. Clean up as the Aluminium swarf and filings go absolutely everywhere! That’s a Health & Safety warning for your wife. It follows me into the house and is a nightmare to get it out the carpet! Trust me, you do not want that!


FIXING IN PLACE

TOOLS NEEDED: Fixing as per how many holes you will have in the total length(s). Only the best 316 Stainless Steel Sleeve Anchors are supplied as extras (additional cost) as standard, at a very special rate (cheaper than Bunnings or Mitre 10 etc) on the Quote. NB: If you are supplying the fixings yourself, do not use Plain Steel, Zinc Coated or Galvanised Sleeve Anchors as they react with the Aluminium and corrode and rust etc (weaken and move). If the length(s) move, they will continue to get worse and squeak and carry on each time someone drives over the installation. You will also need a 13mm tube socket for the Sleeve Anchors, with a diameter no more than 20mm to get through the 20mm top hole of the Kerby™ that you are going to drill out (these are about $50 last time I looked), and a Ratchet (these are also about $50 last time I looked). You will need a special “Hammer” type drill that vibrates and can drill at least a 10mm hole in the concrete (power or battery style) to a depth of 100mm-110mm. You will need a special 10mm 4-Tipped Concrete Drill Bit of at least 150mm long. This goes faster and better than a 10mm 2-Tipped version. These are normally $25 each last time I looked. You will need a 6mm-12mm Hammer Punch to hammer the Sleeve Anchors in place through the holes. These are about $60 last time I looked. You need a rag and something like Turps to clean up the surface of the KERBY™ to finish off. And water for you!

METHOD: Lay down the Clean length(s) where you want the ramp to be (according to the specifications drawing on this website below, to at least 30mm out from the edge of the kerb for water and leaf debris. This also makes for a better, softer angle.). Pre-Drill the 10mm concrete holes to about 10mm deep, to pre-mark out where you want the final concrete holes to be through the Pre-Drilled holes of the extrusion’s 20mm top holes and 11mm bottom holes. This marks out where you want the finished concrete holes to be, better than poking a Sharpie Marker through the holes from the top, the concrete destroys them! Move the lengths away again and finish drilling the 10mm concrete holes to a depth of at least 100mm-110mm deep. Remove dust and waste, a leaf blower works great! Lay the lengths back down again in place. Put the Sleeve Anchors in place through the top hole, through the bottom hole into the concrete. Hammer them all the way in with a Punch or similar until you hear a “ting!”, that’s when the washer touches the extrusion, then they are firmly all the way down and in place. You will need a 13mm tube socket with a diameter of 20mm or less to fit through the top hole to fix the 10mm Sleeve Anchors nuts onto the 11mm bottom holes into the 10mm concrete holes. Tighten them up slowly until slightly firm and they grip. Sometimes, you get one that doesn’t grip, I do not know why, by at this point I have to take it out and add an epoxy glue to make sure it stays in place, as to not weaken all the rest of the length(s). $10 from the Warehouse is fine and sets in 5-20 minutes, enough to tighten it up again as to just before gripping, then wait for the glue to go off (meantime keep reading…). Walk and jump along the ramp length to possibly jiggle it down further to suit the variable undulations (concrete is never perfectly flat!). Go back to the first Sleeve Anchor and firmly tighten them all up from there – not too tight – my socket does a “click” when I then know it’s ‘just right’! From firm to tight, then an extra quarter turn I find. Lastly, and the best bit, put all the Black Nylon Hole Covers in the 20mm top holes to make it look sexy. Wipe all the surfaces down to get rid of the grease. Job done! Ready to go! You will forget it’s there after a week or so. 

Usage

With CLEAN LENGTHS can also be used for wheel chocks for your classic car in the garage to stop you backing back or forward too much, caravan ramps, motorhome or trailer ramps, RV ramps, garden shed ramp for the mower etc. Great for your teenagers to learn how far to go into the garage to park the car the easy way. This way you feel when to stop. Looks way better too! A modern version of that old-stool tennis ball on a string hanging down from the ceiling that touches the wind screen that tells you when to stop.

*4m-A is the Standard Clean (no holes) Un-Cut whole standard Length of KERBY™ is as it comes supplied from the mill. The 4m-A can be cut down or added to to make all the various different configurations. The pricings are all based on using a 4m-A Length economically to eliminate waste.

FIXINGS & FINISHERS ARE ADDITIONAL

M10x50 316 Stainless Steel Sleeve-Anchors (Dynabolt fixings) to suit how many holes you have, can be supplied at a very special price of $8.00+GST each hole. At Mitre 10 or Bunnings, last time I looked were $20 for two! Nylon Dome Hole Covers (Black) to suit how many holes you have, can also be supplied at a very special price of $0.50+GST each hole. Both will be additionally added to the quote sent to you as standard, unless otherwise agreed upon.

NB: Aluminium prices fluctuate, so please bear with us if the prices go up again (it is out of our control). Freight/shipping and custom or ‘tricky’ installation costs vary and are additional. All prices are +GST and are subject to change. 

Please click here or the button below for the T&C’s for the all the different definitions, configurations and terms of the different types of installations.

WITH FIXING HOLES - Easy DIY. Click to learn more…

Pre-Drilled KERBY™ Prices

Pre-Drilled Lengths with 20mm Top Holes and 10mm Bottom Fixing Holes for easy DIY installing*

Length  Configuration Price
1m 1x 1m length (2 Holes) for a Slightly Curved or a Standard Straight entry $250+GST
1.5m 1x 1.5m length (3 Holes) for a Slightly Curved or a Standard Straight entry $350+GST
2m 1x 2m length (3 Holes) for a Slightly Curved or a Standard Straight entry $450+GST
3m 1x 3m length (4 Holes) for a Slightly Curved or a Standard Straight entry $650+GST
4m–A* 1x 4m-A length (5 Holes) for a Standard Straight entry $800+GST
4m–B 1x 3m + 1x 1m lengths (6 Holes) for a Standard Straight entry $900+GST
4m–C 2x 2m lengths (6 Holes) for a Slightly Curved or a Standard Straight entry $900+GST
5m 1x 4m-A + 1x 1m lengths (6 Holes) for a Slightly Curved or a Standard Straight entry $1,050+GST
6m–A 1x 4m-A + 1x 2m lengths (8 Holes) for a Slightly Curved or a Standard Straight entry $1,250+GST
6m–B 3x 2m lengths for a slight curve (10 Holes) for a Slightly Curved or a Standard Straight entry $1,400+GST
6m–C 4x 1.5m lengths for a slight curve (12 Holes) for a Slightly Curved or a Standard Straight entry $1,400+GST
7m 1x 4m-A + 1x 3m lengths (9 Holes) for a Standard Straight entry $1,450+GST
8m 2x 4m-A lengths (10 Holes) for a Slightly Curved or a Standard Straight entry $1,600+GST
9m 2x 4m-A + 1x 1m lengths (12 Holes) for a Standard Straight entry $1,850+GST
10m 2x 4m-A + 1x 2m lengths (13 Holes) for a Standard Straight entry $2,050+GST

Pre-Drilled KERBY™

With PRE-DRILLED (DIY) lengths you need a 20mm diameter long 13mm tube socket to fix the supplied 316 Stainless Steel Dynabolts (Sleeve Anchors) in place through the top of KERBY™’s 20mm top hole, into the 10mm pre-drilled base holes; M10x50 (10mm x 50mm long) 316 Stainless Steel Dynabolts (Sleeve Anchors) and Nylon Black Hole Covers (Caps) are all included and supplied as standard additionally as a part of the final quote, typically as per how many holes you have. 316 Stainless Steel Dynabolts (Sleeve Anchors) are normally $10+GST retail each! You will also need a 10mm concrete drill bit for drilling 100mm deep holes in the gutter area concrete. NB: to start, measure 30mm away from the Curb side, place the KERBY™ down to double-check and mark the KERBY™ holes in place on the concrete in dry weather with a sharpie marker. You will need to clean the concrete area before you start – to be free from leaves, stones, dust and debris – and after you drill, to then place the KERBY™ in place to be ready to install.


NB: FIXINGS ARE ADDITIONAL

M10x50 316 Stainless Steel Sleeve-Anchors (Dynabolt fixings) to suit how many holes you have, can be supplied at a very special price of $8.00+GST each hole. At Mitre 10 or Bunnings, last time I looked were $20 for two! Nylon Dome Hole Covers (Black) to suit how many holes you have, can also be supplied at a very special price of $0.50+GST each hole. Both will be additionally added to the quote sent to you as standard, unless otherwise agreed upon.

Installing: FIXING IN PLACE

TOOLS NEEDED: Fixing as per how many holes you will have in the total length(s). Only the best 316 Stainless Steel Sleeve Anchors are supplied as extras (additional cost) as standard, at a very special rate (cheaper than Bunnings or Mitre 10 etc) on the Quote. NB: If you are supplying the fixings yourself, do not use Plain Steel, Zinc Coated or Galvanised Sleeve Anchors as they react with the Aluminium and corrode and rust etc (weaken and move). If the length(s) move, they will continue to get worse and squeak and carry on each time someone drives over the installation. You will also need a 13mm tube socket for the Sleeve Anchors, with a diameter no more than 20mm to get through the 20mm top hole of the Kerby™ that you are going to drill out (these are about $50 last time I looked), and a Ratchet (these are also about $50 last time I looked). You will need a special “Hammer” type drill that vibrates and can drill at least a 10mm hole in the concrete (power or battery style) to a depth of 100mm-110mm. You will need a special 10mm 4-Tipped Concrete Drill Bit of at least 150mm long. This goes faster and better than a 10mm 2-Tipped version. These are normally $25 each last time I looked. You will need a 6mm-12mm Hammer Punch to hammer the Sleeve Anchors in place through the holes. These are about $60 last time I looked. You need a rag and something like Turps to clean up the surface of the KERBY™ to finish off. And water for you!

METHOD: Lay down the Clean length(s) where you want the ramp to be (according to the specifications drawing on this website below, to at least 30mm out from the edge of the kerb for water and leaf debris. This also makes for a better, softer angle.). Pre-Drill the 10mm concrete holes to about 10mm deep, to pre-mark out where you want the final concrete holes to be through the Pre-Drilled holes of the extrusion’s 20mm top holes and 11mm bottom holes. This marks out where you want the finished concrete holes to be, better than poking a Sharpie Marker through the holes from the top, the concrete destroys them! Move the lengths away again and finish drilling the 10mm concrete holes to a depth of at least 100mm-110mm deep. Remove dust and waste, a leaf blower works great! Lay the lengths back down again in place. Put the Sleeve Anchors in place through the top hole, through the bottom hole into the concrete. Hammer them all the way in with a Punch or similar until you hear a “ting!”, that’s when the washer touches the extrusion, then they are firmly all the way down and in place. You will need a 13mm tube socket with a diameter of 20mm or less to fit through the top hole to fix the 10mm Sleeve Anchors nuts onto the 11mm bottom holes into the 10mm concrete holes. Tighten them up slowly until slightly firm and they grip. Sometimes, you get one that doesn’t grip, I do not know why, by at this point I have to take it out and add an epoxy glue to make sure it stays in place, as to not weaken all the rest of the length(s). $10 from the Warehouse is fine and sets in 5-20 minutes, enough to tighten it up again as to just before gripping, then wait for the glue to go off (meantime keep reading…). Walk and jump along the ramp length to possibly jiggle it down further to suit the variable undulations (concrete is never perfectly flat!). Go back to the first Sleeve Anchor and firmly tighten them all up from there – not too tight – my socket does a “click” when I then know it’s ‘just right’! From firm to tight, then an extra quarter turn I find. Lastly, and the best bit, put all the Black Nylon Hole Covers in the 20mm top holes to make it look sexy. Wipe all the surfaces down to get rid of the grease. Job done! Ready to go! You will forget it’s there after a week or so.

NB: Aluminium prices fluctuate, so please bear with us if the prices go up again (it is out of our control). Freight/shipping and custom or ‘tricky’ installation costs vary and are additional. All prices are +GST and are subject to change. 

Please click here or the button below for the T&C’s for the all the different definitions, configurations and terms of the different types of installations.

All 316 Stainless Steel fixings, hole covers & Installation included!

Installed KERBY™ Prices

Pre-Drilled, Fitted and Fully Installed for you – All 316 Stainless Steel fixings, hole covers & Installation included!

Length Detail Price
1m 1x 1m length (2 Holes) for a Slightly Curved or a Standard Straight entry $300+GST
1.5m 1x 1.5m length (3 Holes) for a Slightly Curved or a Standard Straight entry $400+GST
2m 1x 2m length (3 Holes) for a Slightly Curved or a Standard Straight entry $500+GST
3m 1x 3m length (4 Holes) for a Standard Straight entry $700+GST
4m–A 1x 4m-A length (5 Holes) for a Standard Straight entry $850+GST
4m–B 1x 3m + 1x 1m lengths (6 Holes) for a Standard Straight entry $1,000+GST
4m–C 2x 2m lengths (6 Holes) for a Slightly Curved or a Standard Straight entry $1,000+GST
5m 1x 4m-A + 1x 1m lengths (7 Holes) for a Standard Straight entry $1,150+GST
6m–A 1x 4m-A + 1x 2m lengths (8 Holes) for a Standard Straight entry $1,300+GST
6m–B 3x 2m lengths for a slight curve (9 Holes) for a Slightly Curved or a Standard Straight entry $1,450+GST
6m–C 4× 1.5m lengths for an acute curve (12 Holes) for a Slightly Curved or a Standard Straight entry $1,600+GST
7m 1x 4m-A + 1x 3m lengths (9 Holes) for a Standard Straight entry $1,550+GST
8m 2x 4m-A lengths (10 Holes) for a Slightly Curved or a Standard Straight entry $1,700+GST
9m 2x 4m-A + 1x 1m lengths (12 Holes) for a Standard Straight entry $2,000+GST
10m 2x 4m-A + 1x 2m lengths (13 Holes) for a Standard Straight entry $2,200+GST

Full install means 1x site visit & all labour included.

Currently “INSTALLATION” areas are mainly Christchurch and Selwyn Urban areas only (established new subdivisions and land developments like Kajens Country, Fairfield Way area, Stonebrook area, East Maddisons Road areas, Othello Drive area, Little Rolleston Hamlet area, Woolshed Park area, Highgate area, Newmans Road area, Falcons Landing, Westwood Park area, Farringdon, Olivefields, Eastonfield, Acland Park, The Borough Green, Levi Park, and Branthwaite etc, Rolleston), Waimakariri (including Pegasus) and neighbouring districts. Rural and the wider Canterbury areas, and neighbouring regions all incur a call-out fee starting at $50+GST.

If you are outside of Canterbury, like Auckland for example, a friendly everyday builder can install KERBY™ with a concrete drill, a 10mm Concrete Drill and a 13mm tube socket for the M10X50 316 Stainless Steel DynaBolts (Sleeve Anchors) which are all included*. 

NB: M10x50 316 Stainless Steel Sleeve-Anchors (Dynabolt fixings) and Nylon Dome Hole Covers to suit are all included in the price, supplied as per how many holes you have. 

Installation means drilling holes in the concrete, using special tools to fix down the 316 Stainless Steel Dynabolts/Sleeve Anchors into the concrete (it is removable later by the way!), and finishing with special nylon dome hole covers to make it look sexy. So we deal with all the uneven concrete levels, the slight curves and irregularities that become apparent when we put a straight edge (the KERBY™) in place, and pack underneath with special wedges (unseen), to make it level and stable amongst doing all sorts of other things to make it long-lasting and hopefully perfect for you. 

NB: Aluminium prices fluctuate, so please bear with us if the prices go up again (it is out of our control). Freight/shipping and custom or ‘tricky’ installation costs vary and are additional. All prices are +GST and are subject to change. 

Please click here or the button below for the T&C’s for the all the different definitions, configurations and terms of the different types of installations.

Cool Extras

ADDITIONAL EXTRAS

Length Detail Price
Any length or lengths up to 10m 1x Powder Coating Session $150+GST

We can powder coat any colour (subject to availability and application), to match the garage door and joinery, or make a statement in a bold safety colour.

Fun

Length Detail Price
Any length or lengths up to 10m 1x Glow-In-The-Dark Line (15mm-20mm inlay Sticker) in 15mm-20mm sticky tape inlay near the top, under the Nylon Dome Hole Covers (caps). $50+GST
Durability TBC (untested at this point in time, but if it fails in 3 months, I will replace or refund).

Safety

Length Detail Price
Any length or lengths up to 10m 1x Safety or Hazard or reflective Line in 15mm-20mm sticky tape (TBC) $100+GST

I can supply KERBY New Zealand Wide, even Australia!

Car Ramps Freight costs for one, two or three up to 2.4m lengths, 20kg or less for Christchurch to North Island or South Island Outside Christchurch Areas is around $50+GST. | Freight costs for one 2.5m-4.0m lengths, 20kg or less for Christchurch to North Island or South Island Outside Christchurch Areas varies at about $100+GST*. | Freight costs for two or three 2.5m-4.0m lengths, 25kg-50kg or less for Christchurch to North Island or South Island Outside Christchurch Areas varies at about $150+GST (depending on how many lengths)*.

*NB: Freight costs are calculated on your actual address and subject to change, see our quote/order form here.

KERBY.NZ is the Best Car Ramps on the market in NZ that’s super-strong, simple & effective at eliminating that annoying bump when driving over the curb or your access in your driveway. Make life easy! You’ll forget it’s even there!

See what some of the many happy customers say about The Best Driveway Ramp…

Happy customers

KERBY.NZ Testimonials

“Don’t just take our word for it”…

KERBY™ – 12 Kestrel Street.

Thank you so much – super speedy install and it’s great! 😊

March 2023

KERBY™ – 7 Hauraki Rise

Most aesthicially pleasing.

Exactly what I needed. Bloody boil’, perfect, just right.

I am not scraping the front of my car anymore.

February 2023

KERBY™ – Driveway Crossing

I’d been looking for a suitable and practical driveway crossing installation to suit my wide curved driveway. I was pleasantly surprised to come across the “KERBY™” driveway ramp and made contact with the owner, Clint.

He came out and measured the number of sections required as well as determining what angles they needed to be cut, in order to fit smoothly across the width of the curved driveway. The installation was completed the following day without any issues.

I’m more than happy with the final result as there are now no nasty bumps when entering my driveway, but rather a smooth transition. I’d be more than happy to recommend Clint and his “KERBY™” ramps to anyone who asks.

January 2023

KERBY™ – Custom Instal

I checked the drive ramp.

Extremely nice work!

Thank you!

August 2022,
Custom Instal

KERBY™ – 724 Selwyn Road

Been testing it out this afternoon, great product, works well, very nicely installed, happy customer, thanks again Clint.

June 2022

KERBY™ – 28 Jean Archie Drive

Fantastic, better than expected. I’ll be happy to recommend Kerby to anyone who asks. Very well installed too I might add.

Thank you.

May 2022
GARAGE CAR RAMPS | PORTABLE CAR RAMPS | FIXED FLAT CAR RAMPS | FORKLIFT RAMPS | GATE SLIDER COVERS or RAMPS | CUSTOM ACCESS ROAD RAMPS

Car Ramps: Want The Best possible FLAT PORTABLE or FIXED Access Car Ramp for your situation, home or business?!

Car Ramps: The Best FLAT Access Car Ramps are designed right here in Rolleston (Selwyn, Christchurch NZ), custom made for your situation – to banish that bump and stop you bouncing and scraping!

We had ‘had enough’ of that b@$stard “dip” every time we went in or out of our driveway from the road to the garage / shed / workshop which kept destroying our wheel alignment each month, therefor making our car steer badly and our tyres wear out faster. I used to spend heaps on wheel alignments and new tyres. “Enough!” I said, let’s design the best possible affordable customised FLAT Access Ramps in New Zealand that I could imagine, so I did – it’s better than awesome I reckon!

“Car Ramps: Whatever the application: Flat Fixed access ramps for cars, forklift ramps, kerb ramps, roadside ramps, entry ramps, garage door entrance ramps, curb or kerb access driveway ramps for your garage, shed, workshop or yard  or even wheelchair access. Business or residential. I can even make triangle custom ramps for caravan or motorhome for a full-height kerb that’s light and portable – you name it, I can design and make it, it will work, I guarantee it!, just ask”.

Clint's Fixed Access Car Ramps – The Best Road-side Gutter Garage Driveway Entrance Car Ramps

Need quicker smoother, SAFER access via a Flat Fixed Gutter Kerb to Garage Entrance Ramp for your lowered or new car?

Car Ramps eliminate that annoying step-up from the road to your garage, warehouse, shed or barn!

These heavy duty Aluminium Flat Fixed driveway access car ramps solve many entrance approach problems (work or at home) as you drive in and out, stopping you bottoming out or scraping the bottom of your lowered car. Clint’s Car Ramps look and perform the best and are far cheaper than most other products you can get to NZ. So support local, support NZ!

Car Ramps stop bottoming out, scraping, bouncing & bumping over the garage kerb lip and drainage dip in front of your garage. Clint’s driveway or road-side access car ramps are made in Rolleston Christchurch, NZ and can be installed locally in Canterbury at your place in a flash. Elsewhere by arrangement. 

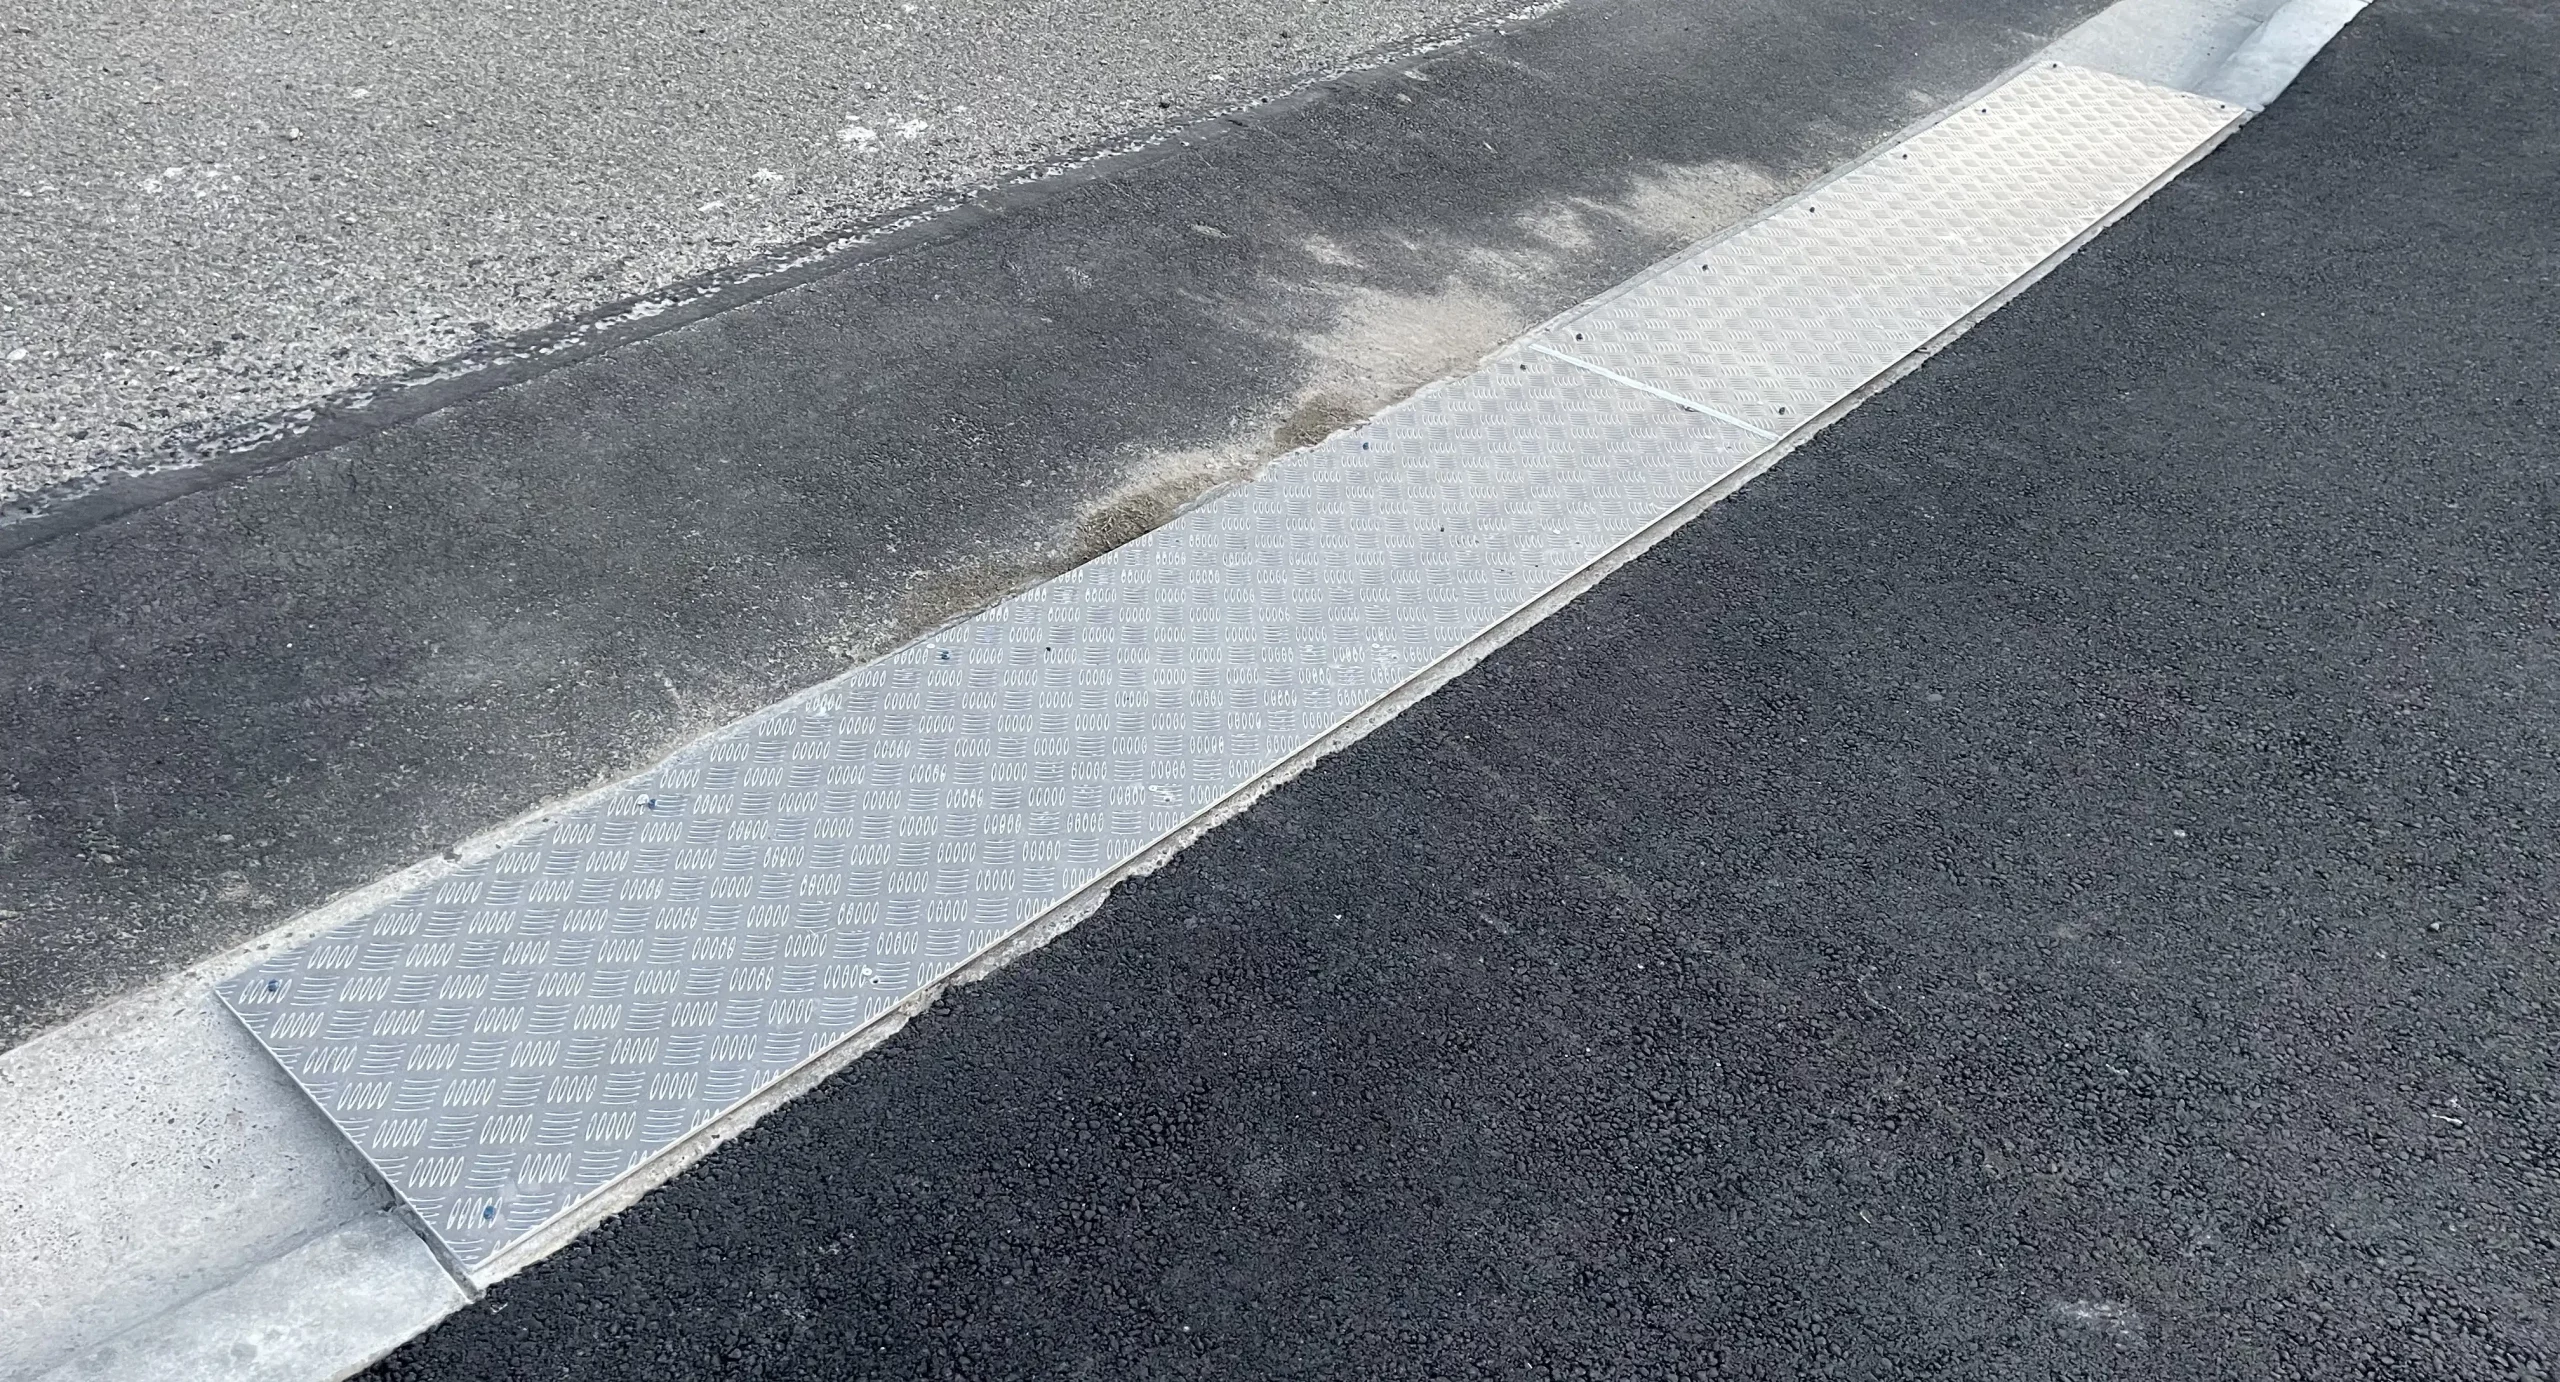
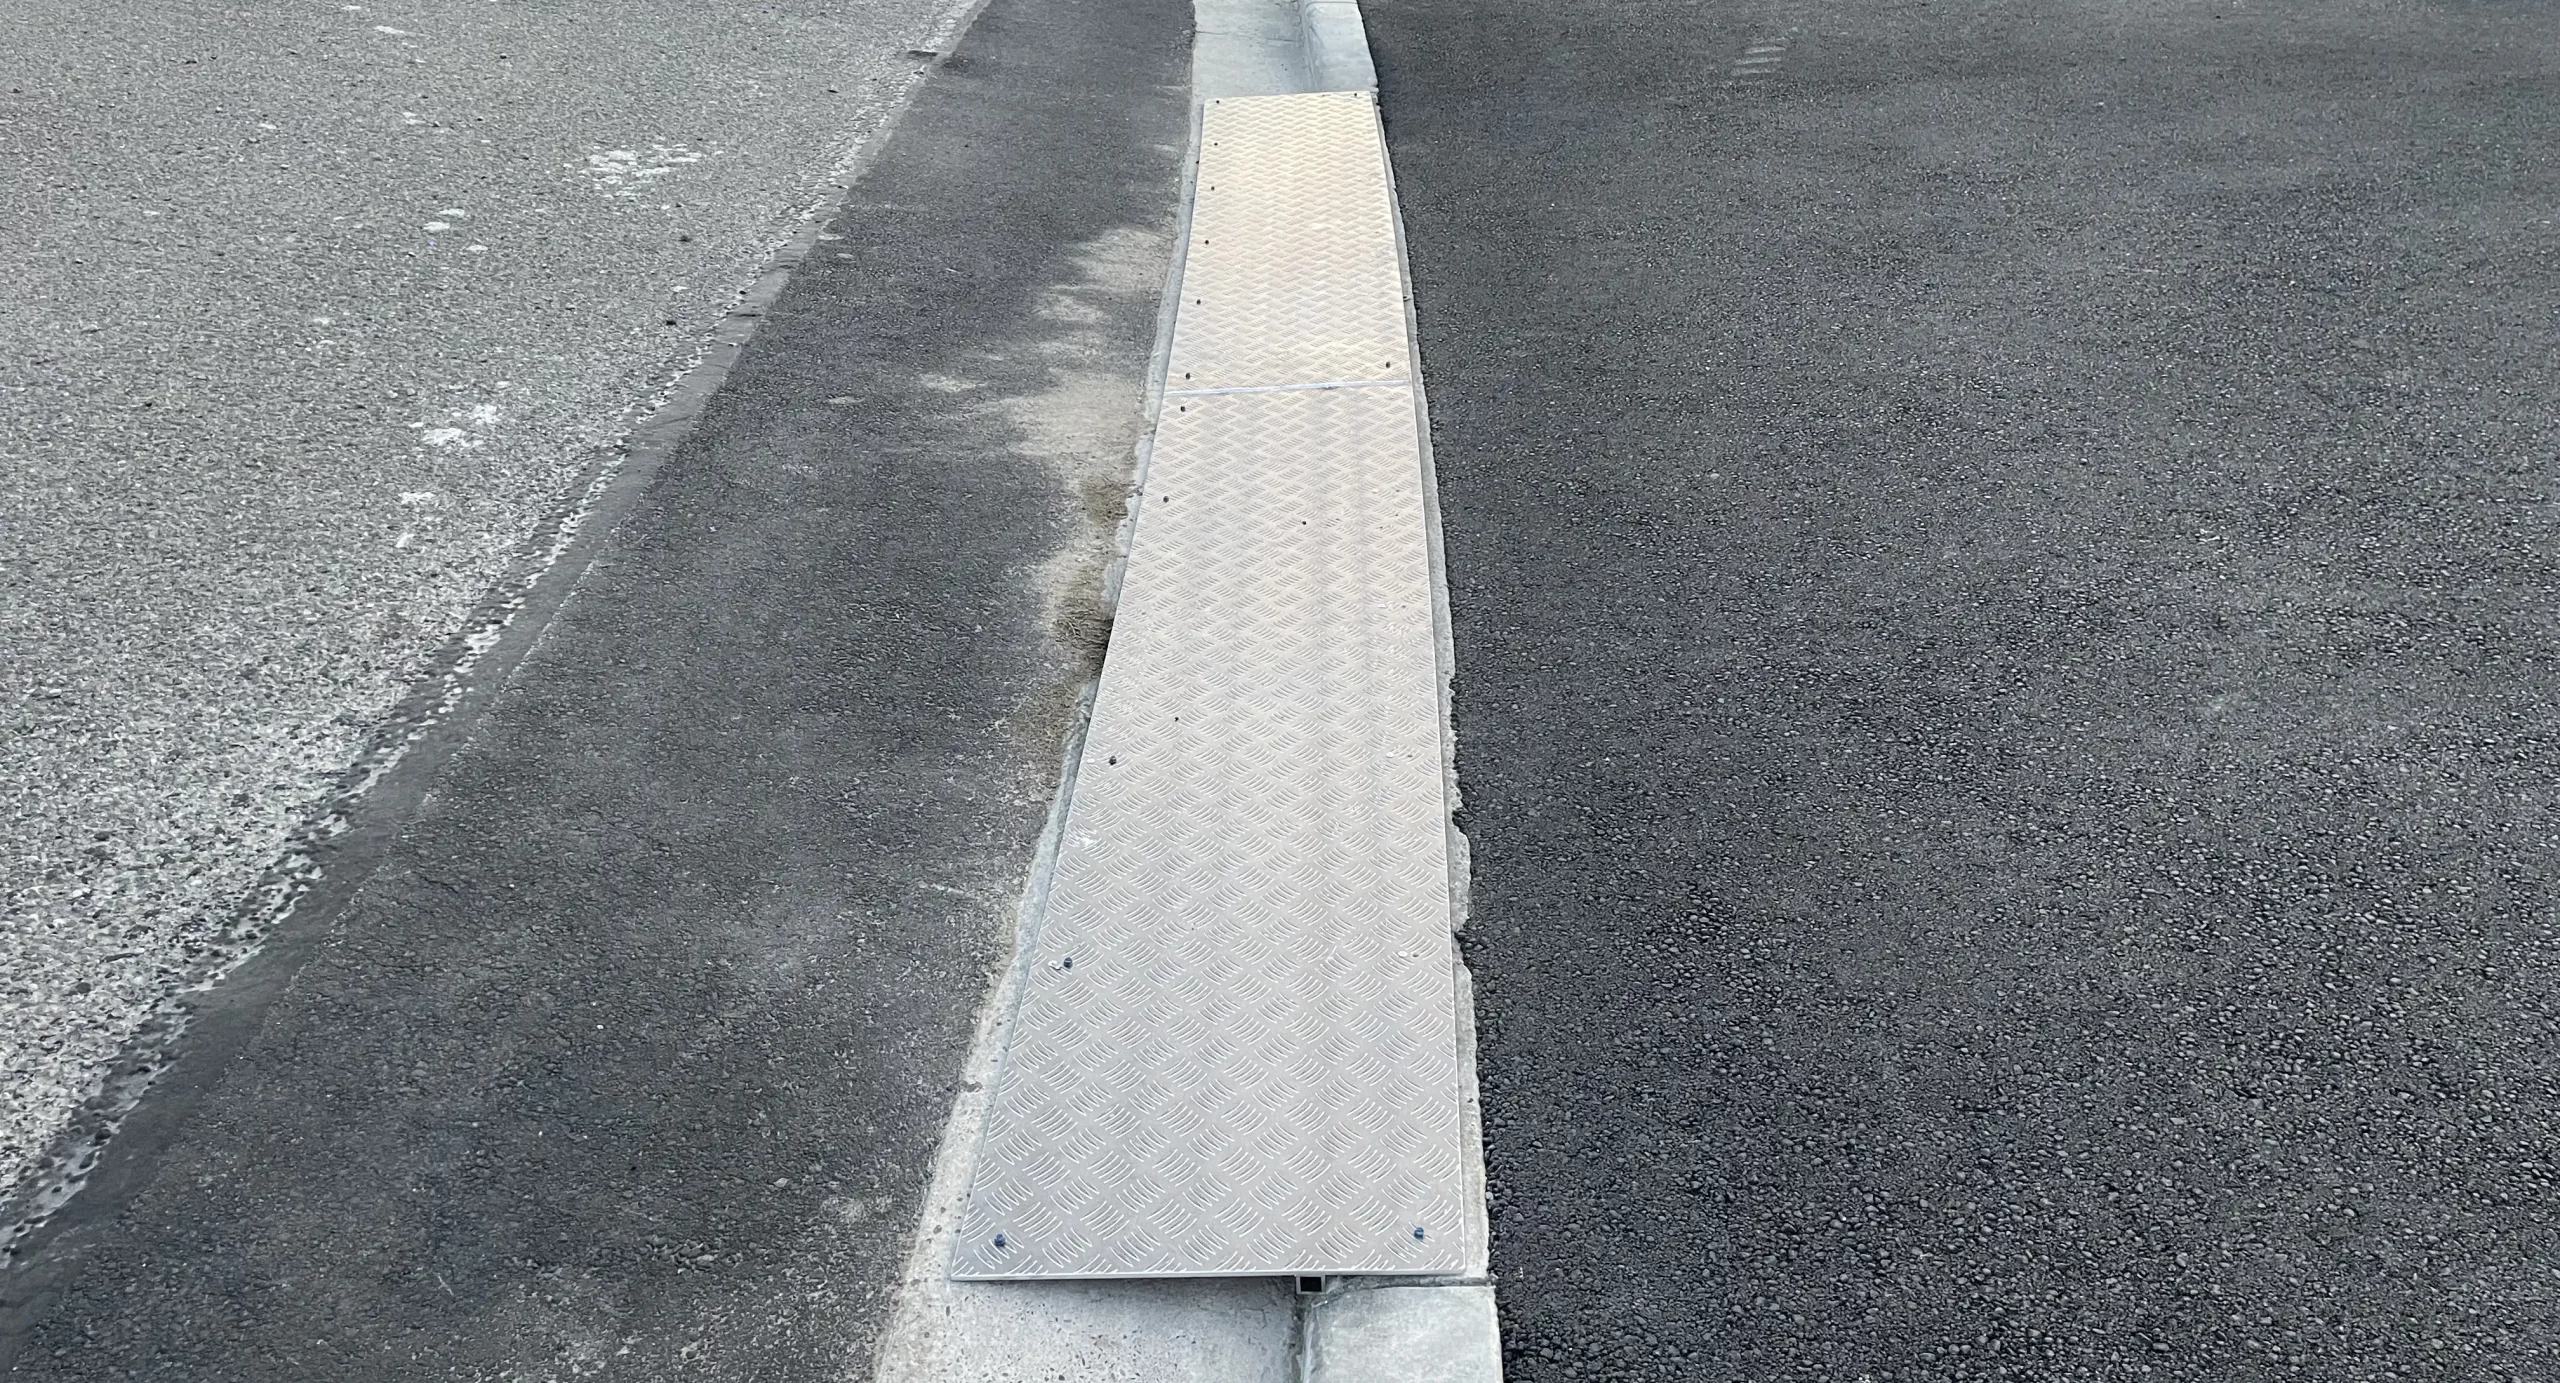
All Clint’s Car Ramps, are Flat Ramps made from high grade 6mm Aluminium Chequered Plate that is light, good looking and won’t rust, and no sagging for the best possible looks and performance, plus can be customised to suit your space, and even be powder coated to match your place! Maximum 3m wide before I need to weld ramps together to span wider driveways. They are even braced from behind to take the heaviest car or light truck. Maximum 1490mm deep, usually 500mm for the roadside to touch both the kerb top and the asphalt on the road. I can laser cut them to any shape – even curved!

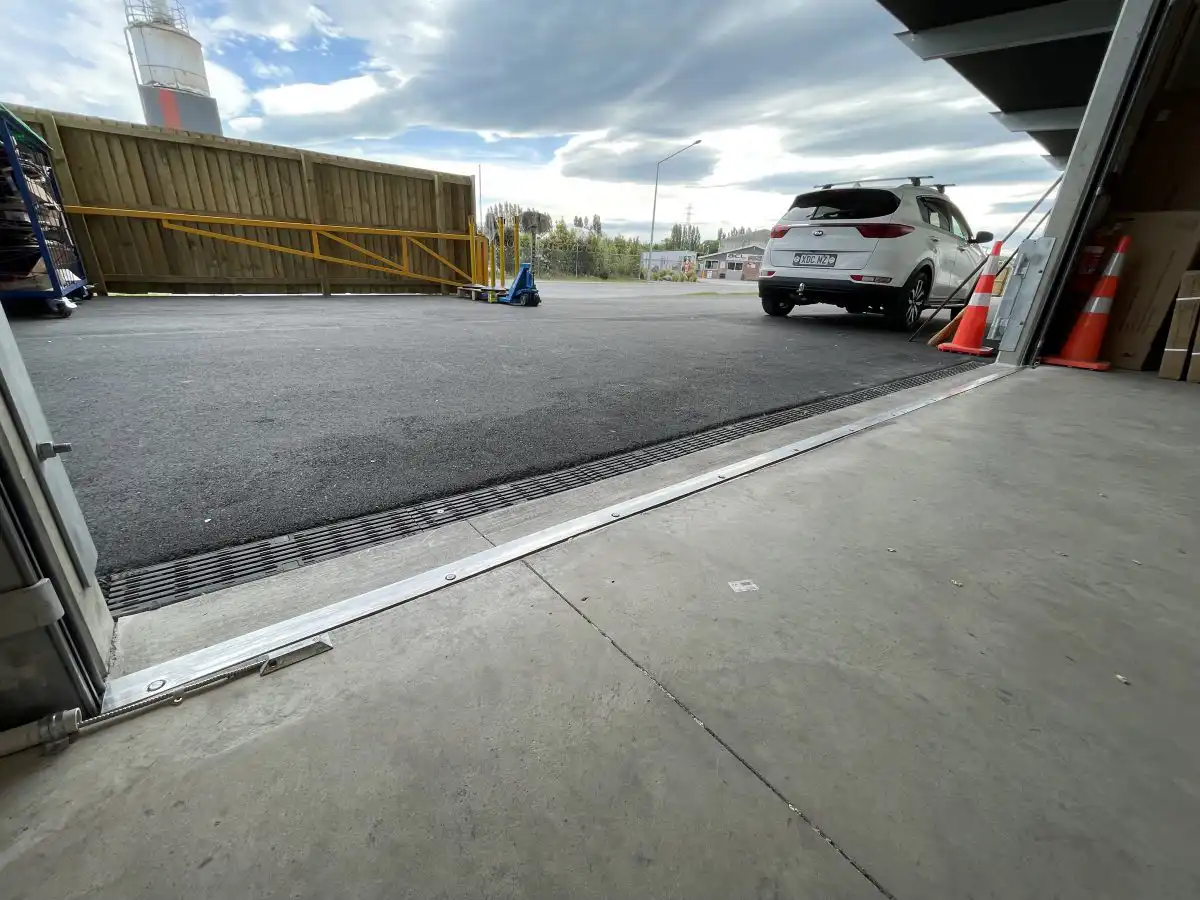
The image on the left is a curved flat car ramp, laser cut, welded from behind for the best looks and fixed with 10mm Stainless Steel Sleeve Anchors (Dynabolts). This is for a car hire business at the airport, so super-busy. So easy, so peaceful (no noise) and safe for the client’s customers).

Why damage your car every time you pull in or out of your garage from the busy road? 

Clint's Portable Access Car Ramps – The Best Garage Entrance Driveway Ramps for lowered or small cars in NZ

Need quicker smoother, SAFER access via a Flat PORTABLE Garage Entrance Car Ramps?

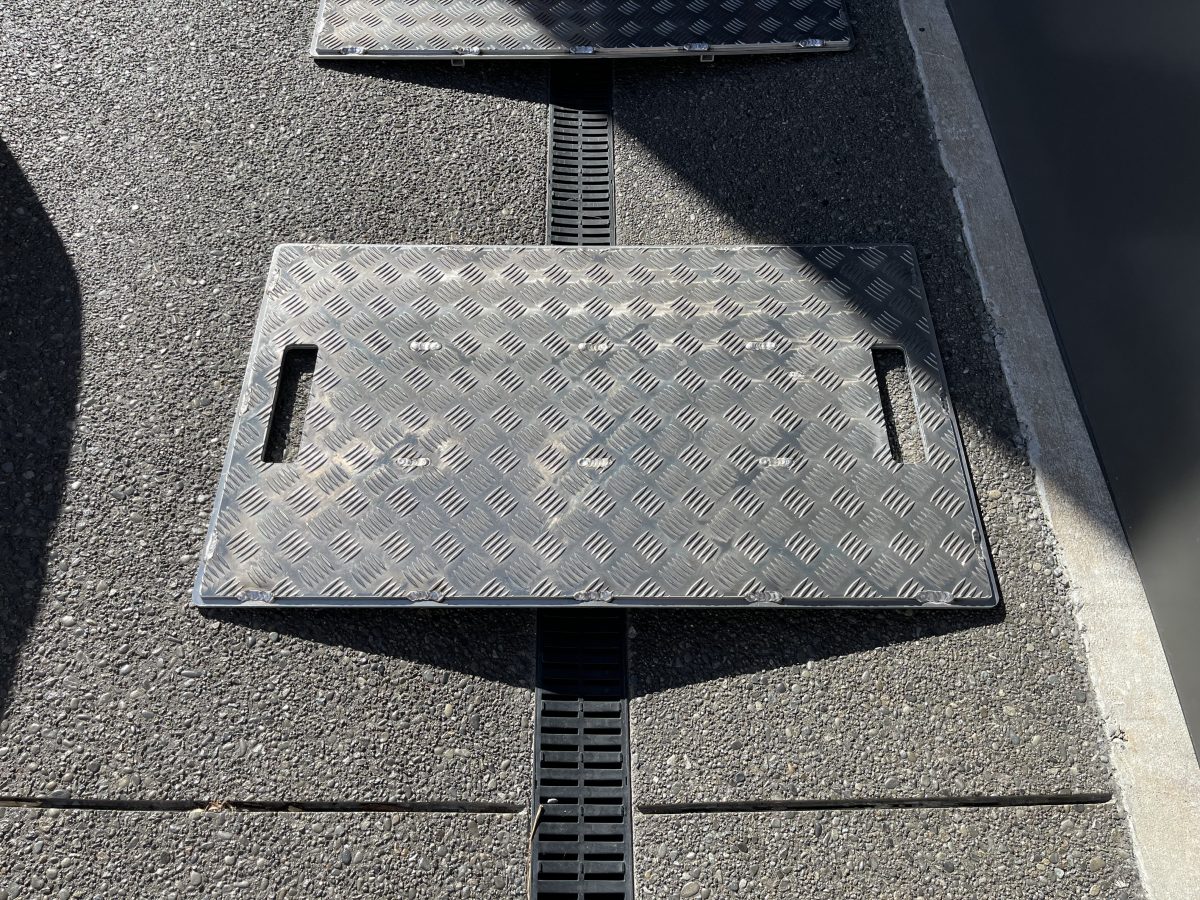
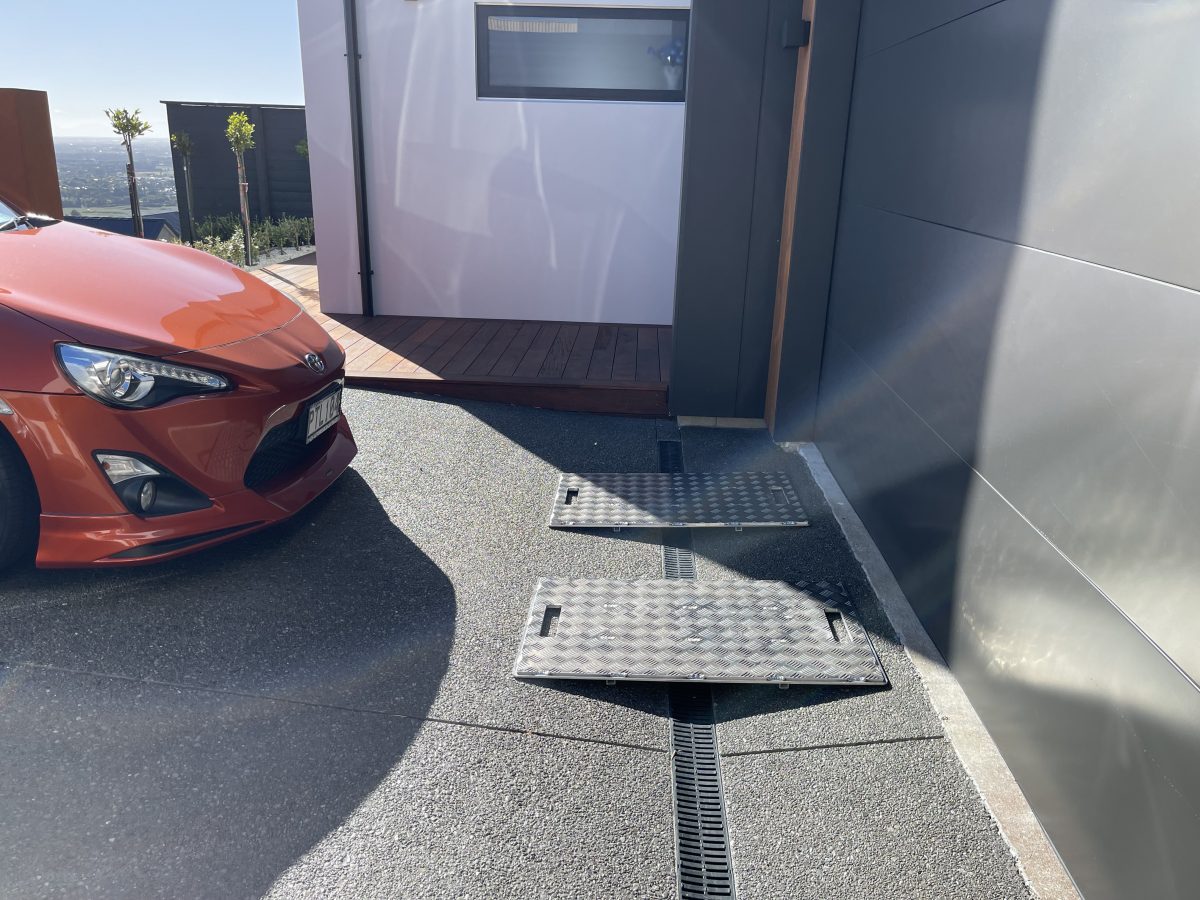
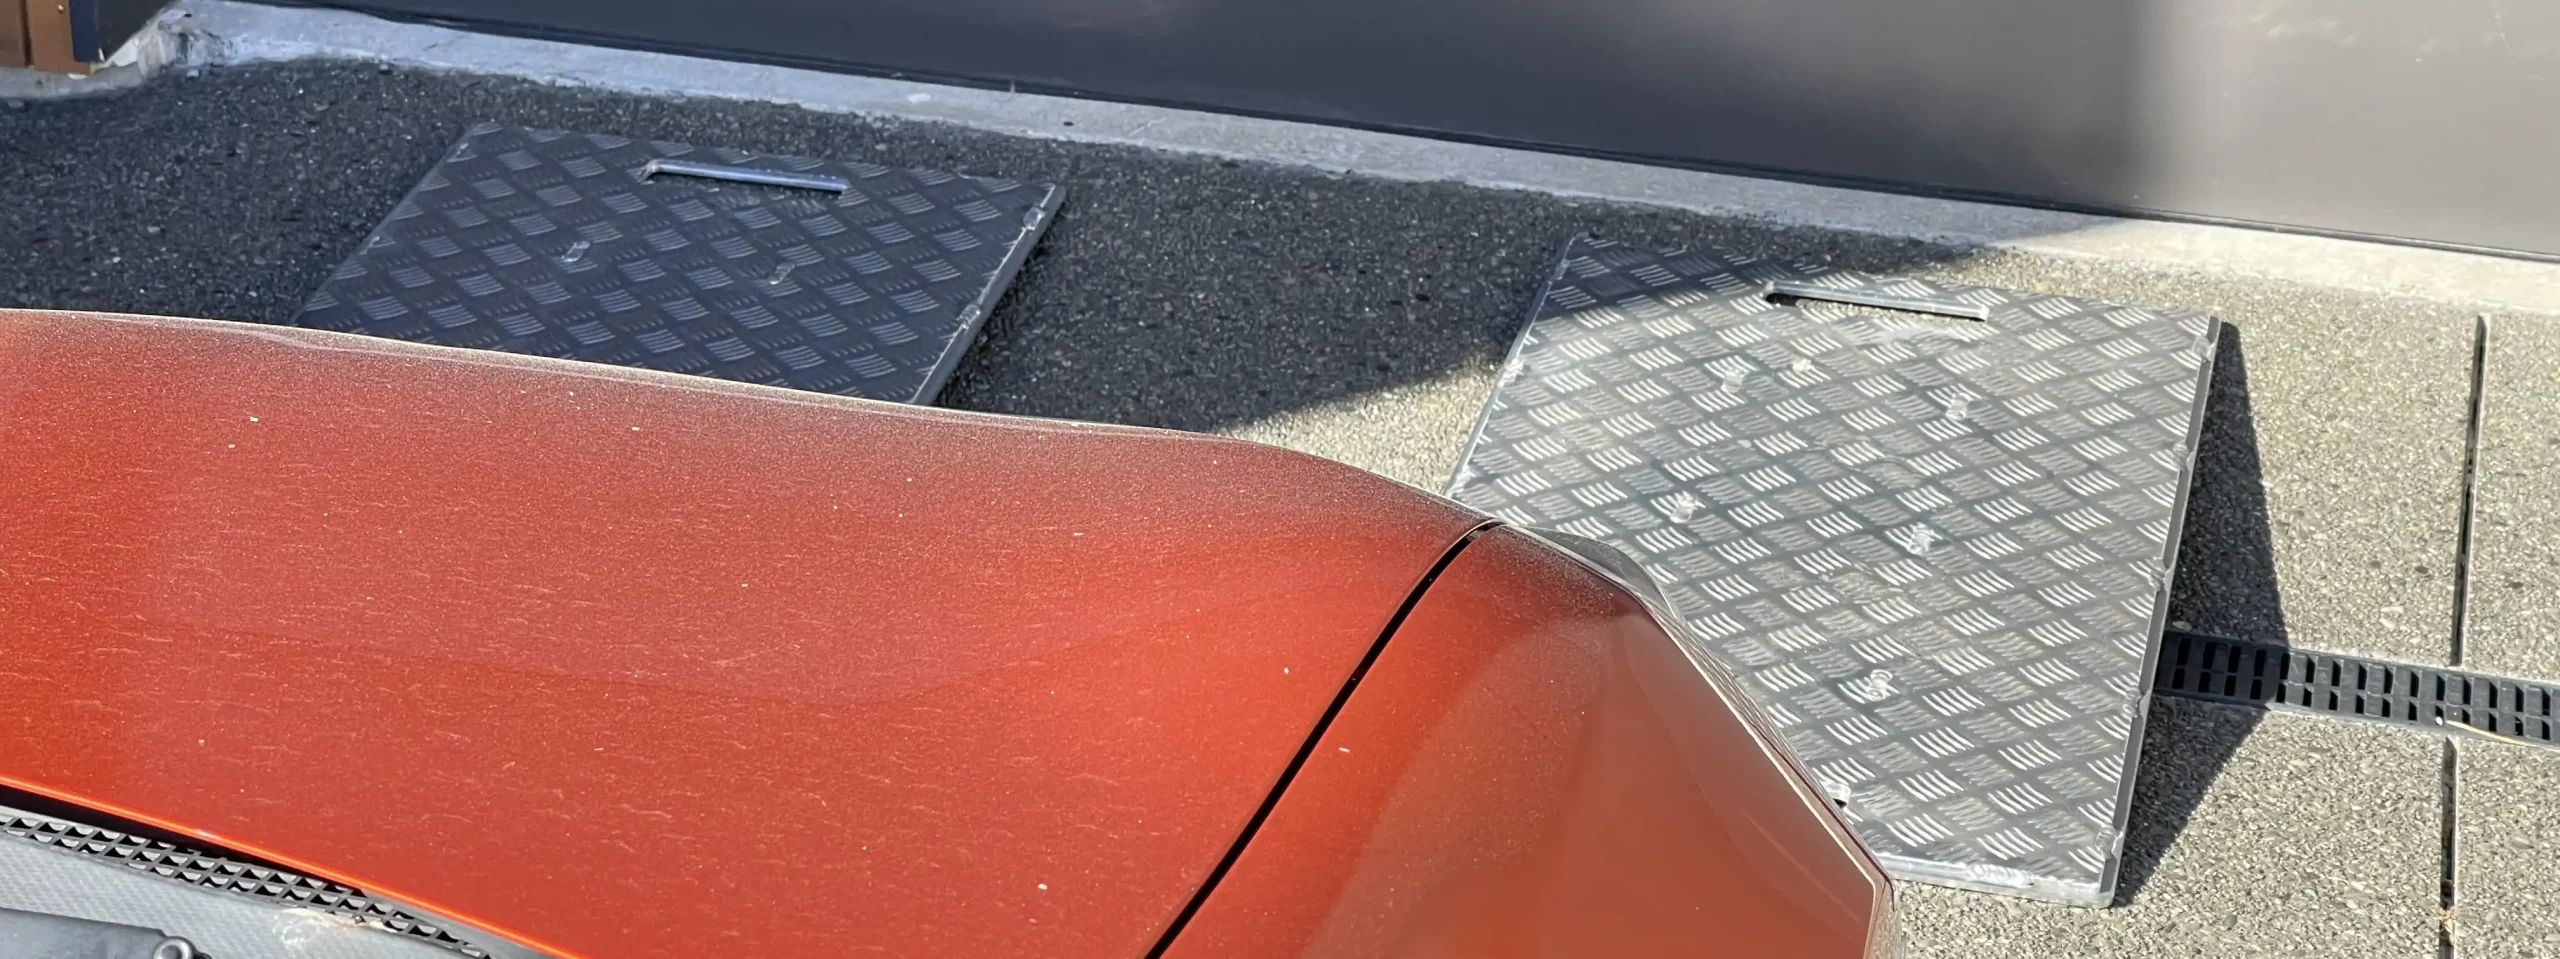
Why risk damaging your car every time you pull in or out of your garage? These are great for the boomerang kids that want to come home to stay for a while. You can pick them up and store them away in the garage. Great for lowered cars or new smaller cars that struggle to go over that dip in the driveway where the drain channel is. These heavy duty Aluminium Flat Portable driveway car ramps solve many entrance problems as you drive in and out of your driveway into the garage, stopping you bottoming out or scraping the bottom or front of your car. Clint’s Portable Car Ramps look and perform the best and are far cheaper than most other products or re-doing the driveway concrete.

Car Ramps for Hill houses: Stop bottoming out, scraping, bouncing & bumping over the garage curb dip and drainage grill in front of your garage. Clint’s driveway Access Portable Car Ramps are made in Rolleston Christchurch, NZ and can be installed locally at your place in a flash. Elsewhere freighted for only about $50.

The Portable Access/ Entry Car Ramps pictured are 600mm x 800mm. This is the prototype and has been doubled up to 12mm. New Portable Car Ramps made will not have all the welds all over it and will be lighter and thinner (still strong enough) at 6mm Aluminium chequered plate for grip. These ramps can be laser cut to any size and have any amount of shapes or handle holes cut out too. And you can powder coat them any colour! Best thing is they are very light and can be stored away after use, I laser cut hand holes in them at each end.

Want to eliminate that annoying dip in your driveway and get back normality?

Clint's 
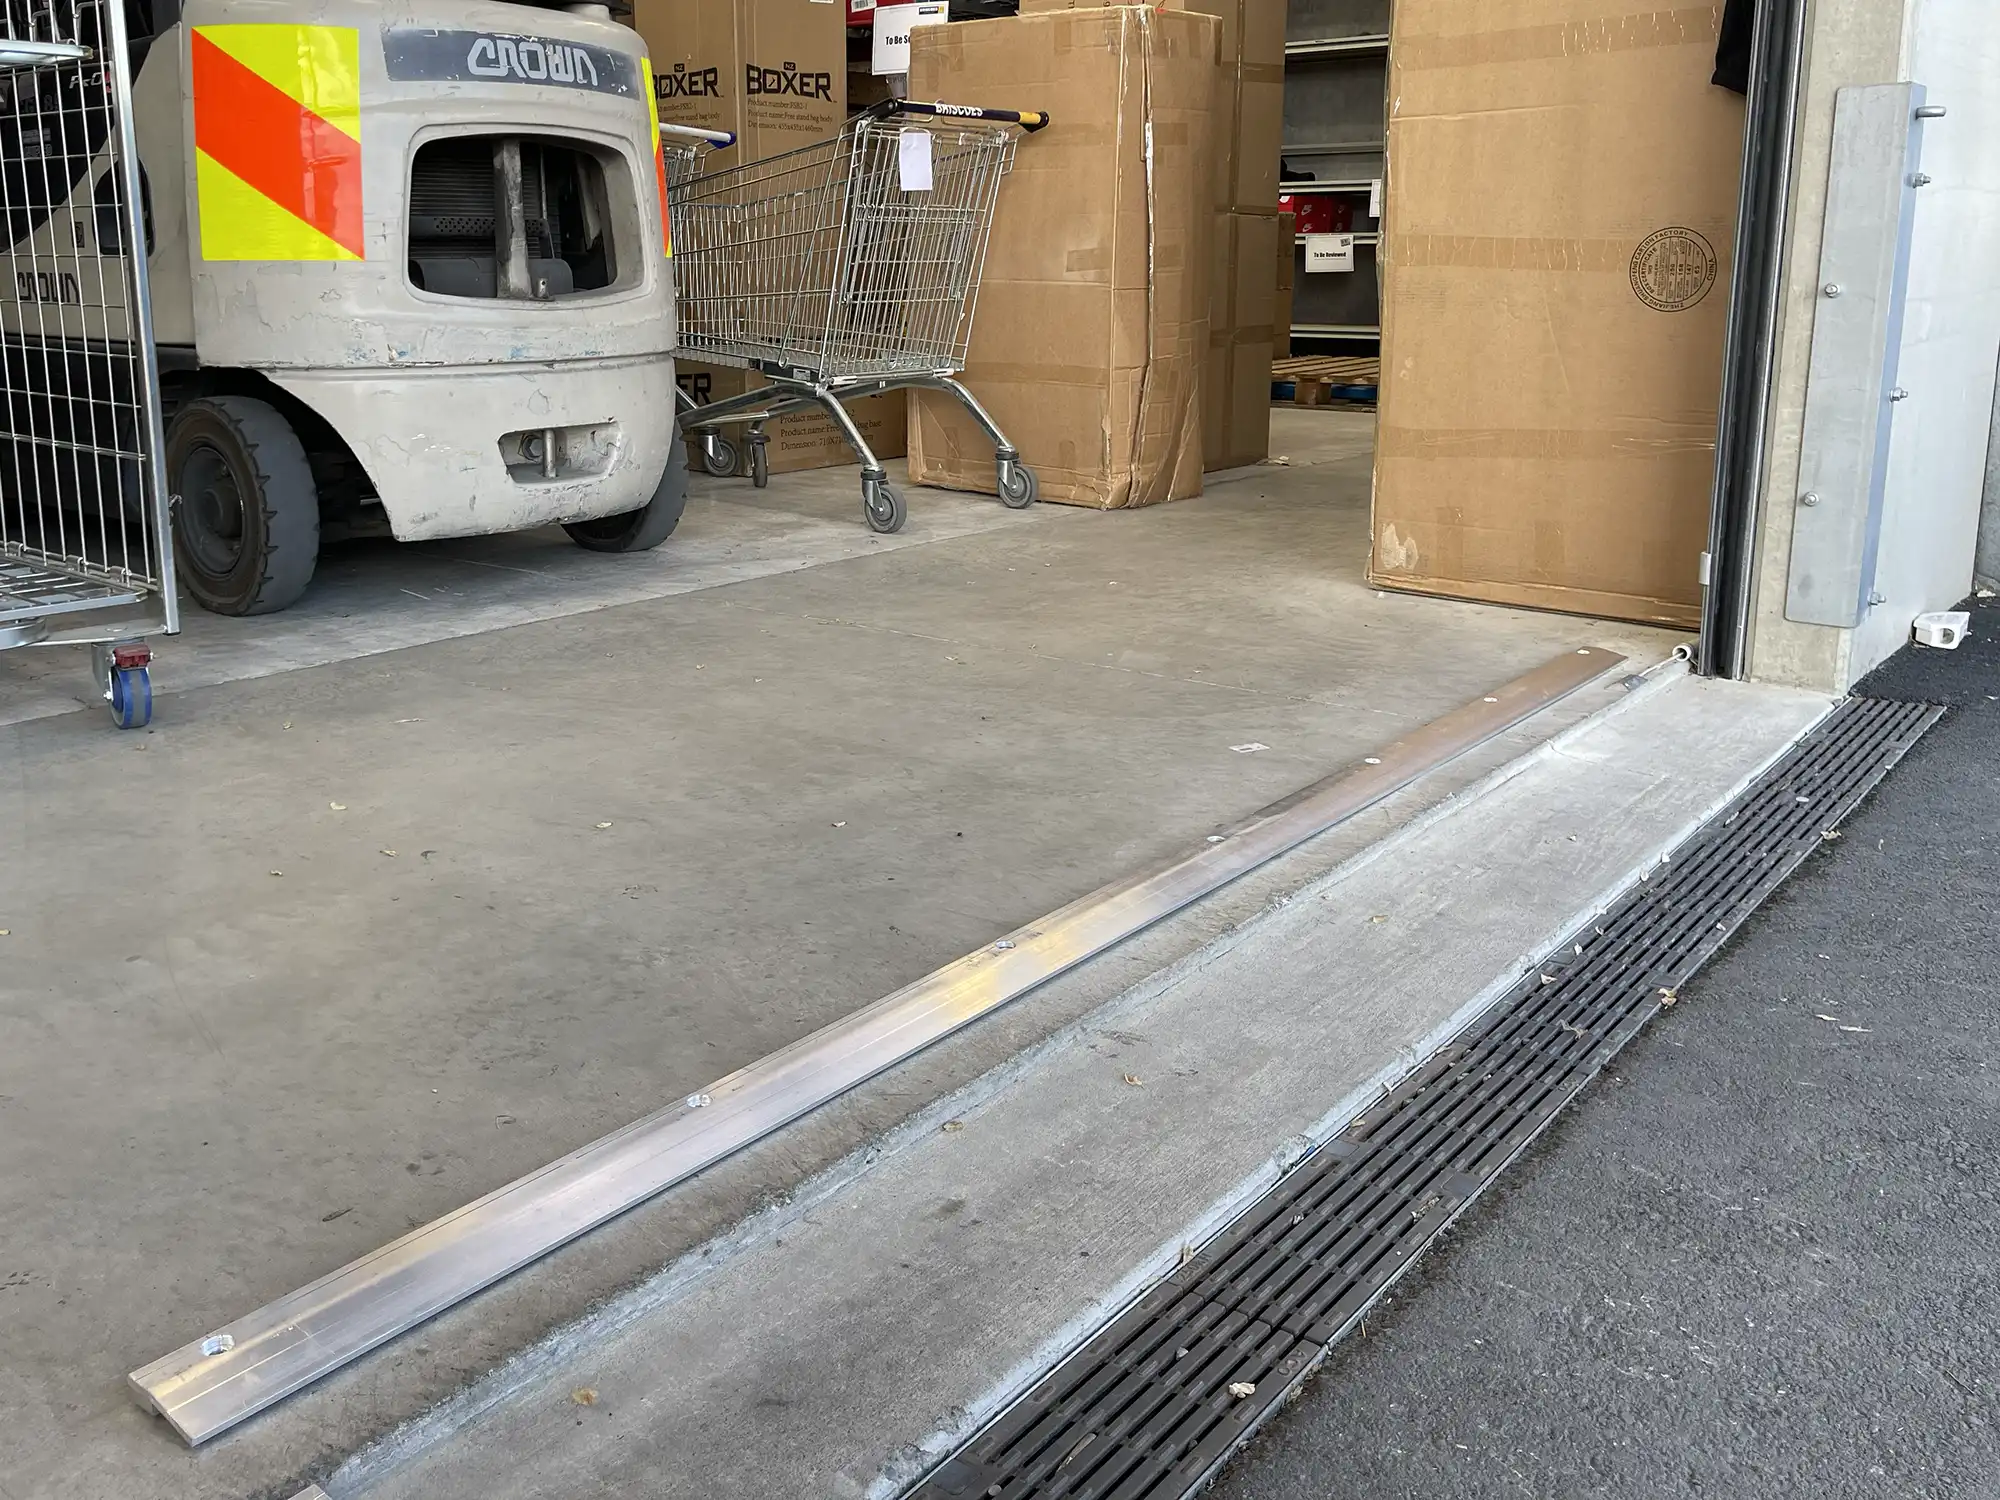
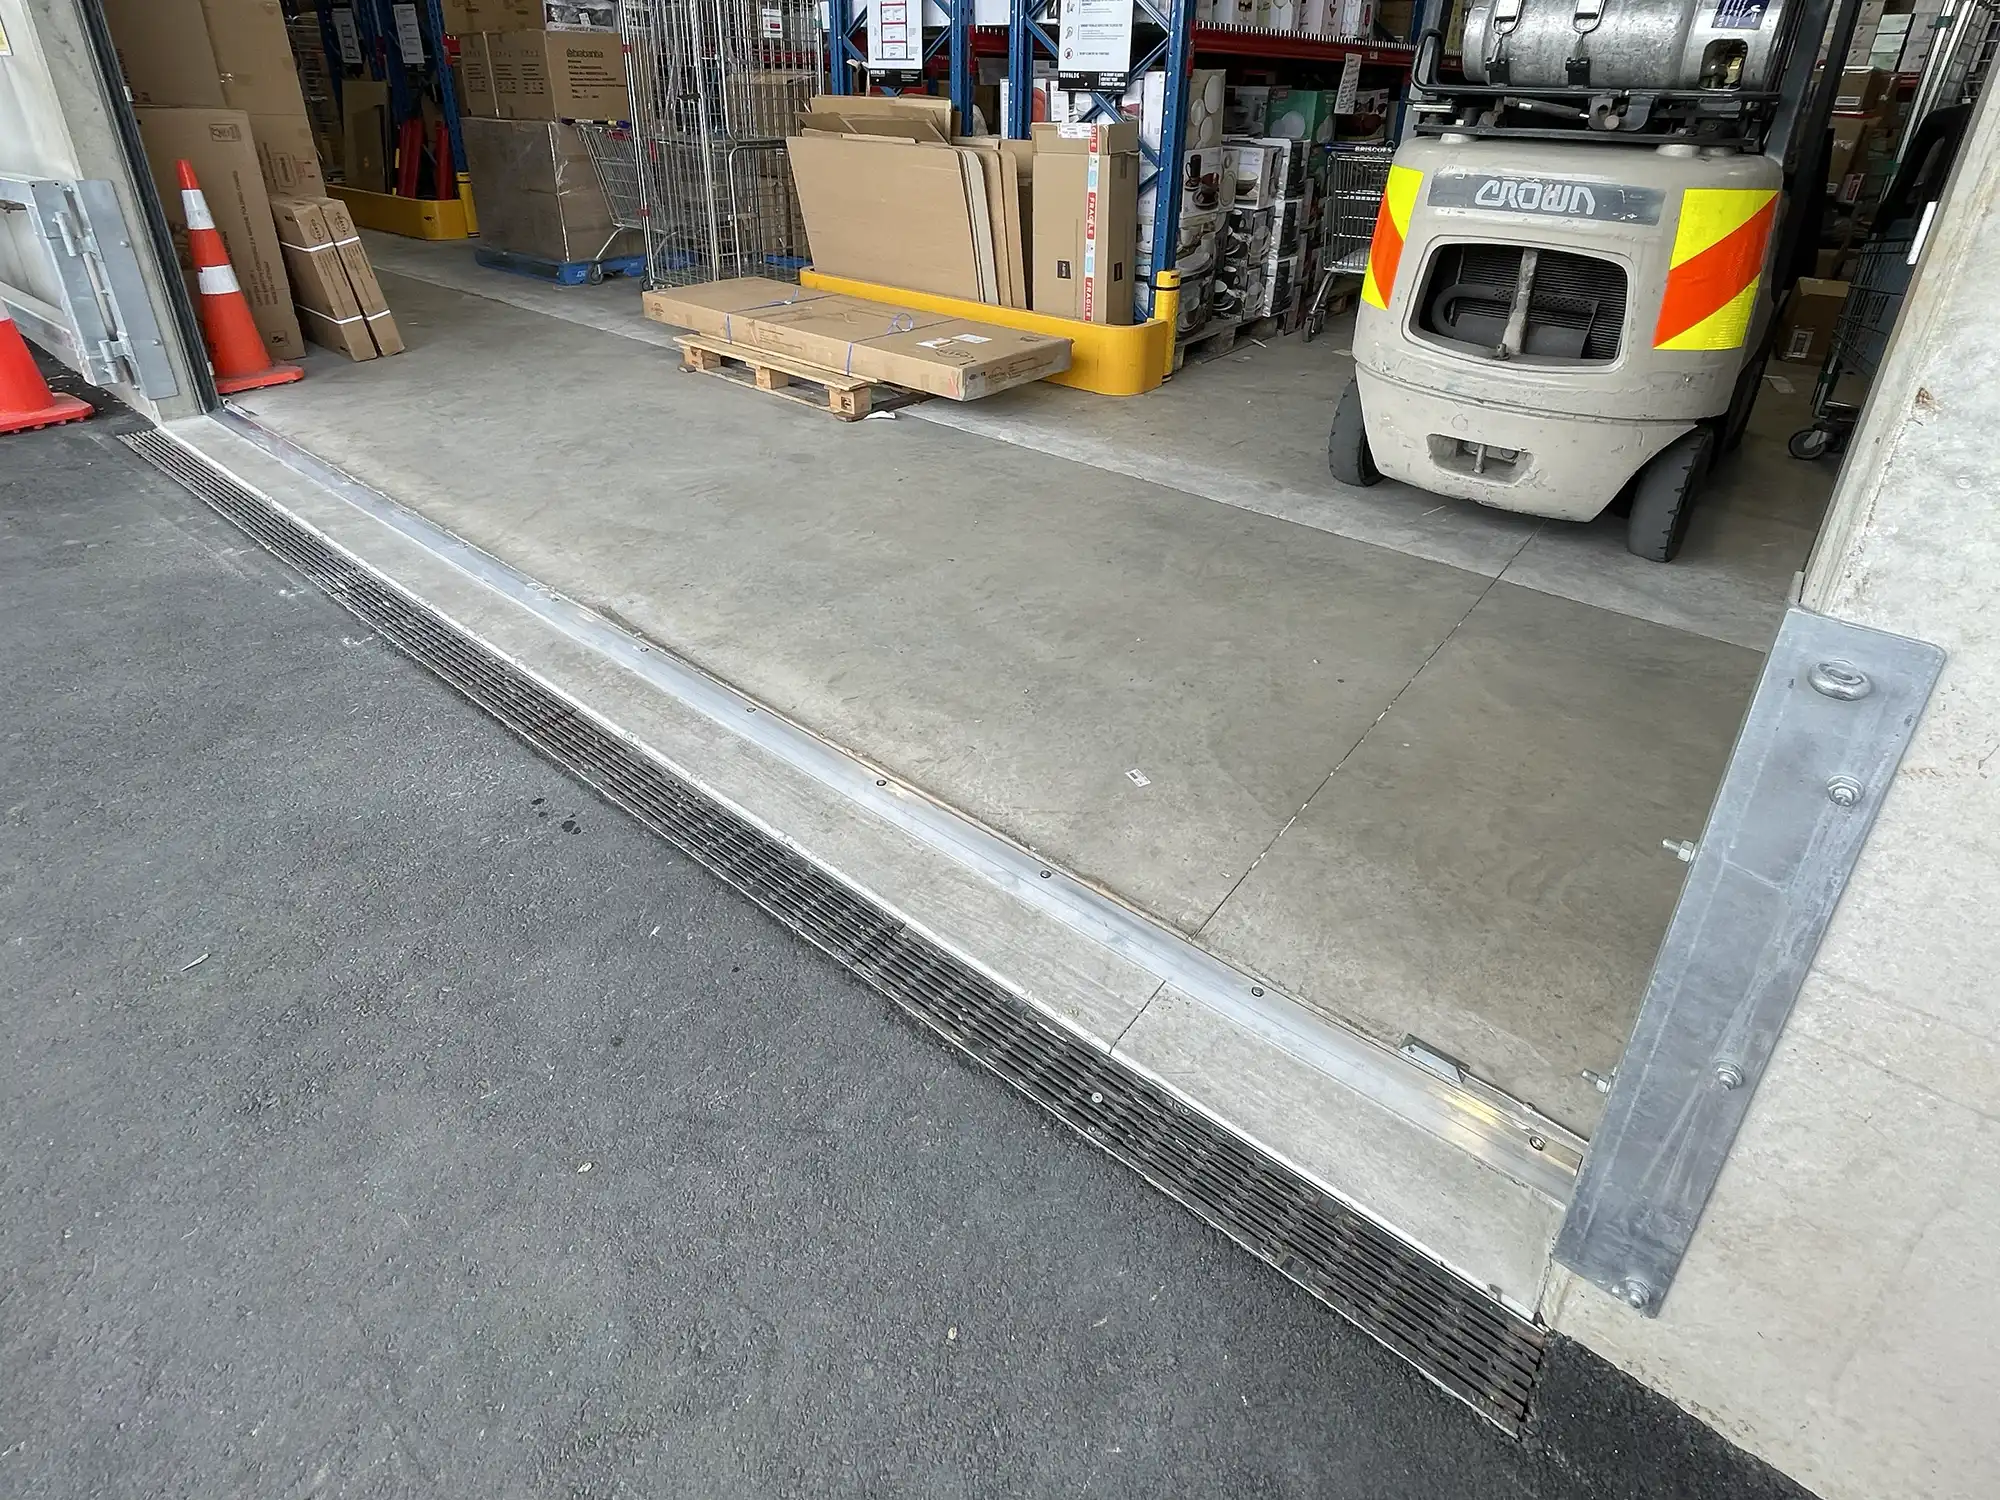
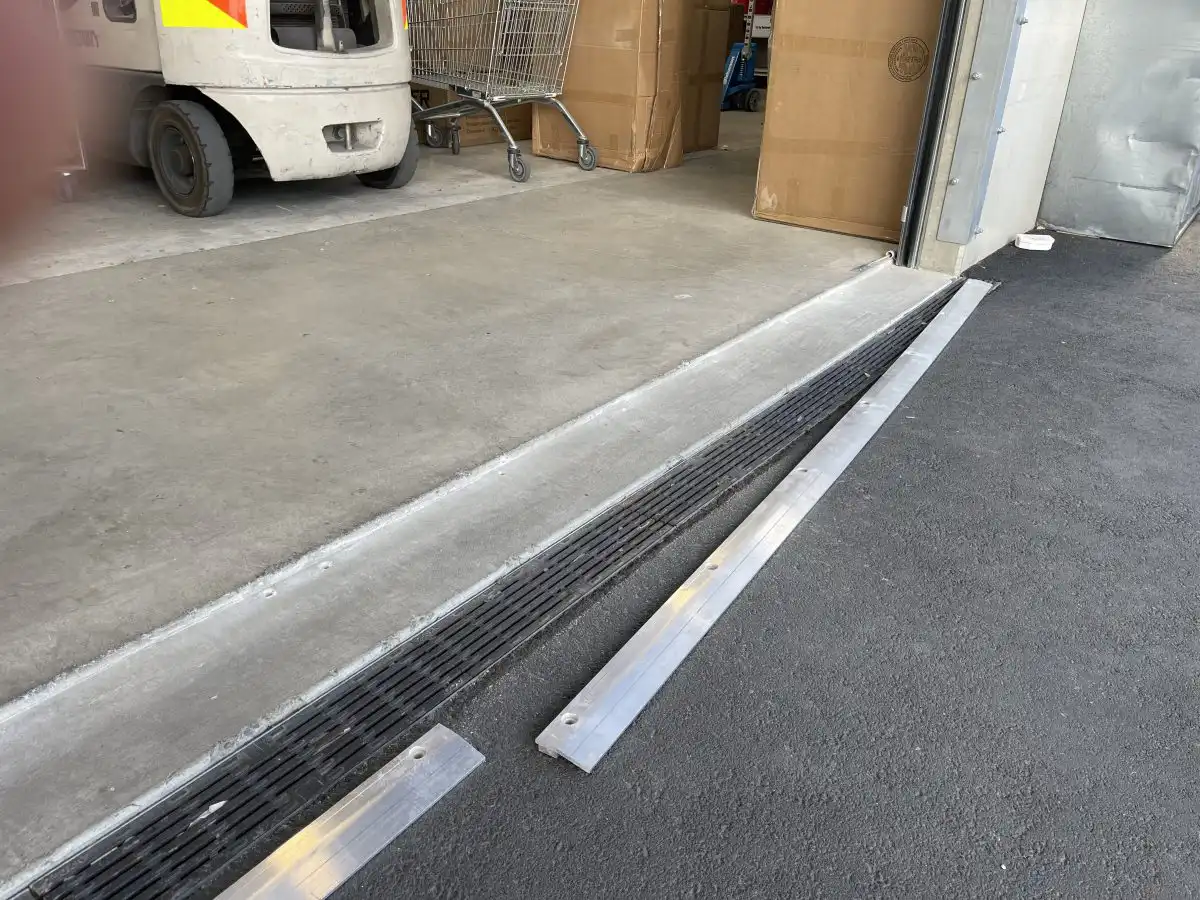
Forklift Ramps – The Best Warehouse, Business, Gate Slider Entrance Ramps

Need quicker smoother, SAFER access via a Flat Fixed Workshop Entrance Ramp?

These heavy duty Aluminium Flat Fixed Forklift ramps solve many entry problems as you drive in and out, stopping you bottoming out or scraping the bottom of your forklift and makes for a far more stable load when going over that bump. Clint’s Forklift Ramps look and perform the best and is far cheaper than most other products in NZ. In fact I am not aware of anyone else doing this, so we’ll look after you with a good price. 

Why risk loosing your load or damaging your load every time you pull in or out of your warehouse? Need to eliminate a Health & Safety risk or hazard?

Stop bottoming out, scraping, bouncing & bumping over the entrance kerb lip or Gate Slider rails in the yard and possibly loosing your load. Clint’s Forklift ramps are made in Rolleston Christchurch, NZ and can be installed locally at your place in a flash. Support local, support NZ! 

These Flat Forklift Ramps made from high grade industrial Aluminium can be customised to suit your space, any size, any height. Awesome for eliminating the Sliding Gates’ roller rails on the ground! Even fully loaded trucks are no match for these solid and strong ramps.

Want to eliminate that annoying step-up in your warehouse, shed or barn?

Car Ramps NZ | Car Ramps Christchurch | Car Ramps Auckland | Car Ramps Wellington | Car Ramps Dunedin | Car Ramps for sports cars | Car Ramps for small cars | Car Ramps for classic cars | Car Ramps for lowered cars | Car Ramps Repco | Car Ramps Supercheap | Car Ramps Super-cheap | Car Ramps Bunnings | Car Ramps Mitre 10 are the common terms I get asked for, but you can only get these car ramps from Clint’s Ramps in New Zealand.